6 Blog Post Templates to Boost Your Content Creation Process
Writing great content that ranks high, engages the readers, and boosts conversions is not easy.
And having to worry about things like formatting doesn’t make it any easier. Neither does the occasional writer’s block.
This is where blog post templates come in the picture to save the day.
Instead of staring at a blank page for hours or aimless writing without any structure, you can use blog post templates to add some structure to the process.
Blog post templates basically provide a rough outline and a way to structure your content. This makes the process faster and more efficient.
With blog post templates, all you have to do is come up with topic ideas, do your research, and start writing. You don’t need to spend time thinking about how to structure your post.
But that’s not all.
Blog post templates optimize your content creation process by making it possible to:
- Write great content that’s well-organized and visually appealing
- Make your content more readable and scannable to enable readers find what they’re
- Create a new blog post faster and keep up with your content calendar or posting schedule
Ready to check out some amazing blog post templates?
Keep reading.
6 Blog Post Templates to Improve Your Blogging Process
Here are six free blog post templates to use in your next blog post and tips on how to get the best results from your writing.
1. Blog Post Templates for Step-By-Step Guides
These are the blog post templates that are used for creating step-by-step guides.
They guide readers through the process of doing something using simple and numbered actions.
Step-by-step guides or how-to posts help establish your authority in your field.
To determine if you should use this blog post template, check if:
- You’re describing a process using multiple steps
- These steps are listed in a chronological order
- Readers who follow the steps in their right order will achieve a specific goal
If any of these statements don’t apply to your post, consider another format.
Let’s look at some examples of blog posts that provide a step-by-step guide.
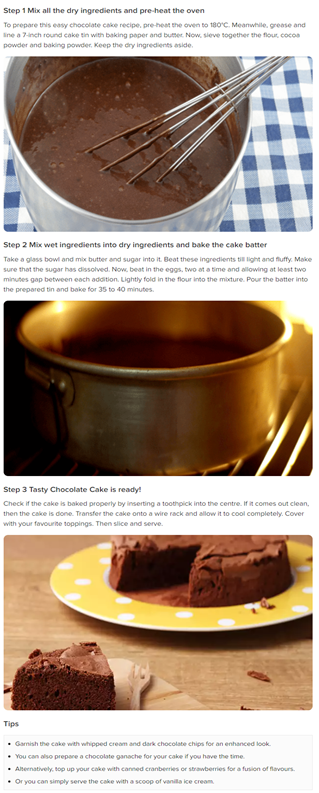
Here is a short step-by-step guide on making chocolate cake. The writer uses high-quality images to make the steps easy to follow.
Also, check out this longer step-by-step guide on how to start a business.
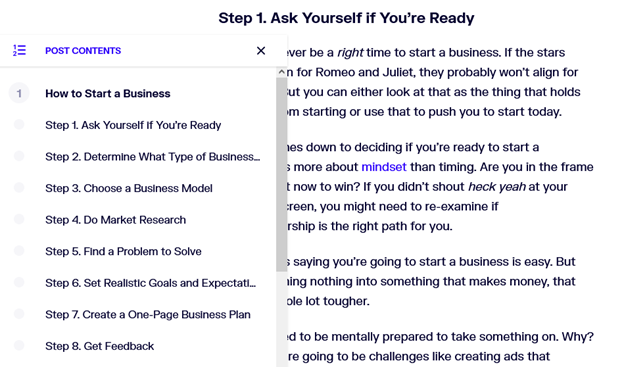
The writer uses a table of content to provide the readers with an outline of the content. They can conveniently revisit any step for a quick reminder without having to scroll the entire document.
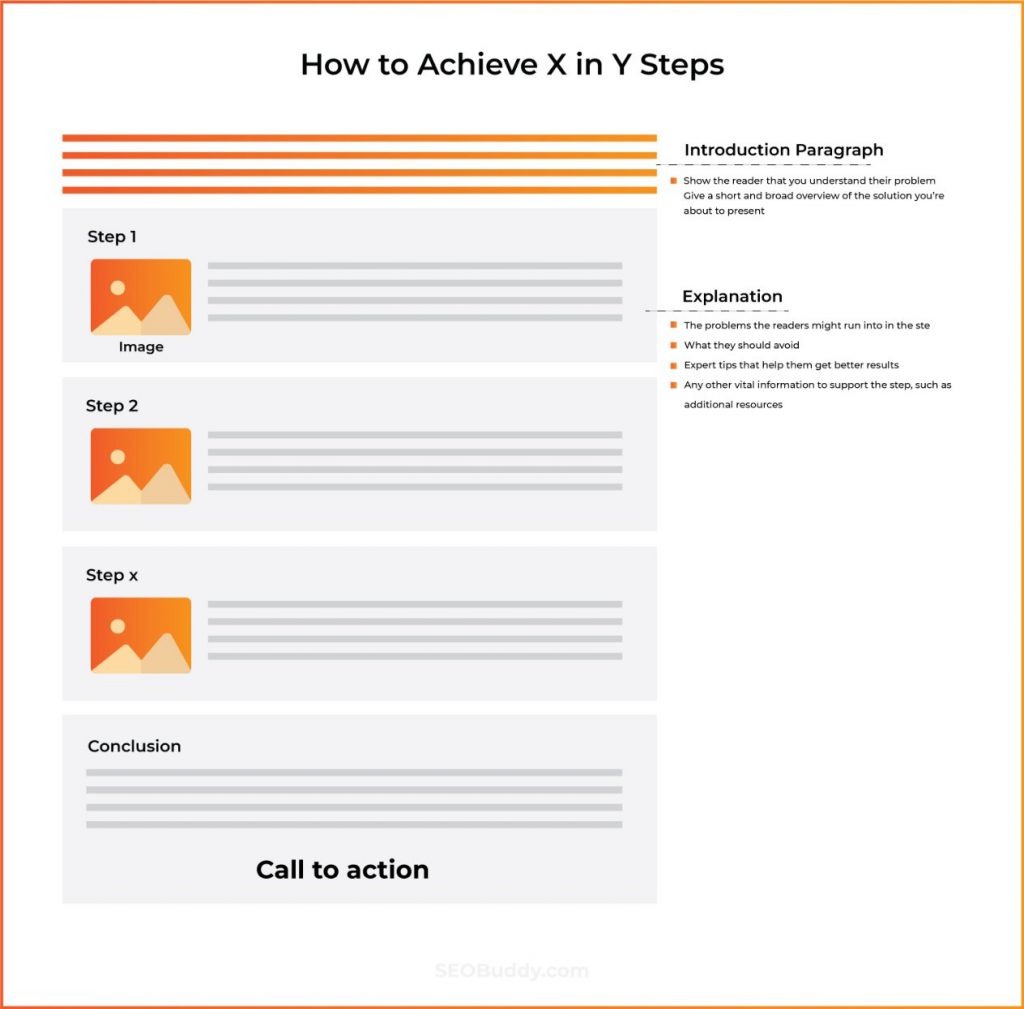
Elements of Blog Post Templates for Step-By-Step Guides
Blog post templates for step-by-step guides have a title, body (steps), and conclusion, just like any post. The key characteristic of such a post, however, is that the body contains multiple steps as headings and an explanation of each step under those headings.
Let’s understand each element of a step-by-step process guide in more detail.
Title of Step-By-Step Blog Post Templates
Most titles of step-by-step guides have a “how to (achieve x)” format.
Make it interesting with a twist like:
- “How to (achieve X) Despite (common hindrance or pain point)”
- “How to (achieve X) and (extra benefit your post provides)”
- “How to (achieve X) in Y (adjective) Steps
For step-by-step articles, it’s important to use active verbs in the title. It tells the readers that you’ll help them solve a problem and not just give generic knowledge.
Also, keep the title straightforward.
Use words that a regular person would use when searching the internet for a solution to their problem.
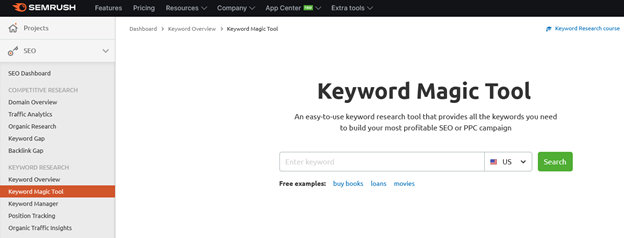
A keyword research tool like Semrush’s Keyword Magic Tool can help you find these search terms.
Keep in mind that your keyword will hold more SEO weight if it’s at the beginning of the title.
Introductions of Step-By-Step Blog Post Templates
The introduction of a step-by-step guide should provide an overview of what you’ll cover.
Keep it brief but be smart about it by considering the complexity of the topic.
The introduction of a topic like “how to make a smoothie in 3 steps”, for instance, should be as brief as possible. This will prevent the readers from losing interest.
A more technical topic will require a little more depth to set the context for the readers.
Overall, your introduction should:
- Show the readers that you understand their problem
- Give a short and broad overview of the solution you’re about to present
The Body of Step-By-Step Blog Post Templates
You should break the process down into steps. Each step should be a numbered heading.
Under every step, explain what readers should do at that step.
Try to start each step with a verb in the present tense. It gives the readers a clear direction of the action they need to take. Use active verbs throughout the description as well.
Here are some things you can include in each step:
- The problems the readers might face
- What mistakes they should avoid
- Expert tips that can help them get better results
- Any other vital information to support the step, such as additional resources
It’s also important to add high-quality visuals to your descriptions.
Use images, GIFs, or videos to demonstrate each step clearly. Visuals provide the readers with more value.
The Conclusion of Step-By-Step Blog Post Templates
After the last step, the readers should have achieved what they set out to do.
The conclusion of a how-to guide should be a summary of the process and a suggestion of the next action the readers should take.
If you sell a relevant product, the ecommerce SEO best practice to follow is to mention it and include its link.
In the same way, if you have a content hub, encourage the readers to check out more content that they would find interesting.
Tips for Writing an Awesome Step-By-Step Post
Here are some tips to get the most out of using step-by-step blog post templates for creating content.
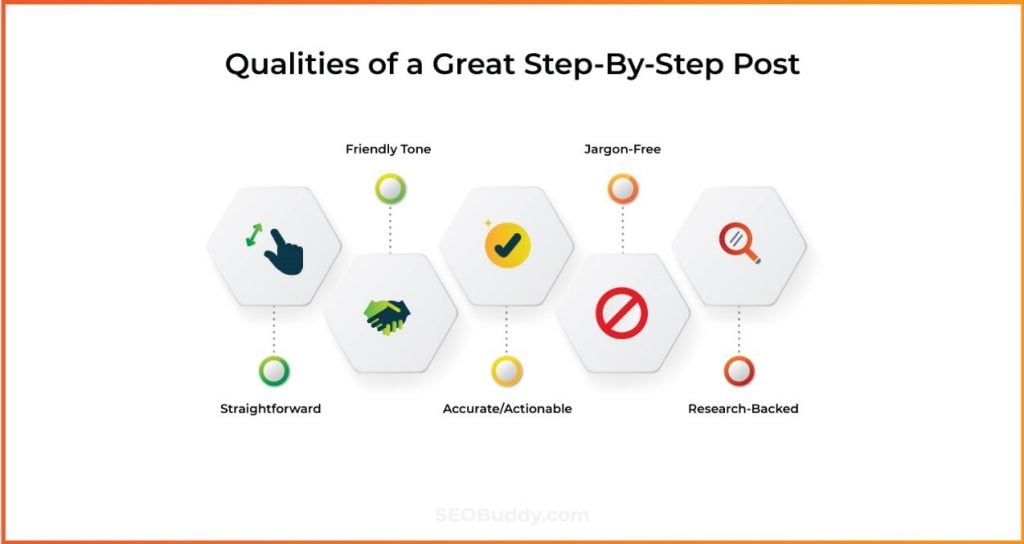
Tip 1: Make the Post Easy To Follow
The readers should be able to understand your how-to post without getting frustrated or having tons of questions.
Avoid over-explaining your points or including irrelevant details. It will only confuse the readers and make the guide hard to comprehend.
Tip 2: Use a Friendly Tone
The tone of your guide should be friendly and helpful but assuring.
It should show the readers that you are confident about what you’re talking about without speaking down to them.
Tip 3: Test Your Steps
Your how-to post will only be good if it works practically. Test if your steps deliver the desired results or have someone else verify the accuracy of the process.
An accurate step-by-step guide will build your customers’ trust in your blog. They’ll see it as a reliable source of information.
Tip 4: Communicate With Your Audience Effectively
Make your how-to posts easy-to-read by using simple language and avoiding any technical terms or jargon.
Complex words will only make you lose a reader’s attention mid-way.
Tip 5: Use Research to Back Your Points
How-to articles need to be thorough and backed by proper research.
For that, it’s important to understand why your audience is reading your how-to post. This will ensure that the post delivers exactly what they seek.
Despite how much you know on the blog post topic, research and gather as much relevant information to back up your how-to post as possible. Ensure you’ve covered every necessary step.
Include details like:
- Statistics from credible websites (remember to link to your sources)
- Important definitions
- References to helpful tools and products
2. List-Type Blog Post Templates
When you need to create content on tips, myths, products, or techniques, list-type blog post templates are of great help.
List-type blog post templates assist in writing articles that make sense as a list but don’t need to follow a specific order (non-chronological).
Need some blog post examples of list posts?
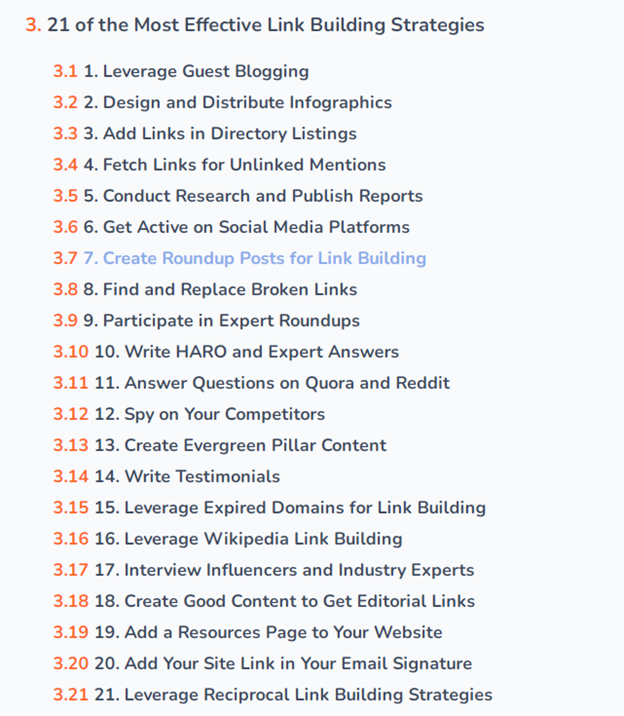
Here’s one. Check out this article on 21 Link Building Strategies to Boost Your SEO in 2022 with a list of 21 tactics.
A list blog post is also known as a listicle.
These blog posts are appealing for several reasons:
- List posts make it easy for the audience to read and understand the blog content fast. This is because they break large blocks of content into neat and easily digestible pieces.
- List posts allow busy readers to skim through the article and still obtain the key information or facts.
- If the readers come across an item on the list that they’re not interested in, they can move on to the next.
How do you know a topic can work as a list blog post? If you have x different things that contribute to a central message, you can make it into a list-type blog post.
Elements of List-Type Blog Post Templates
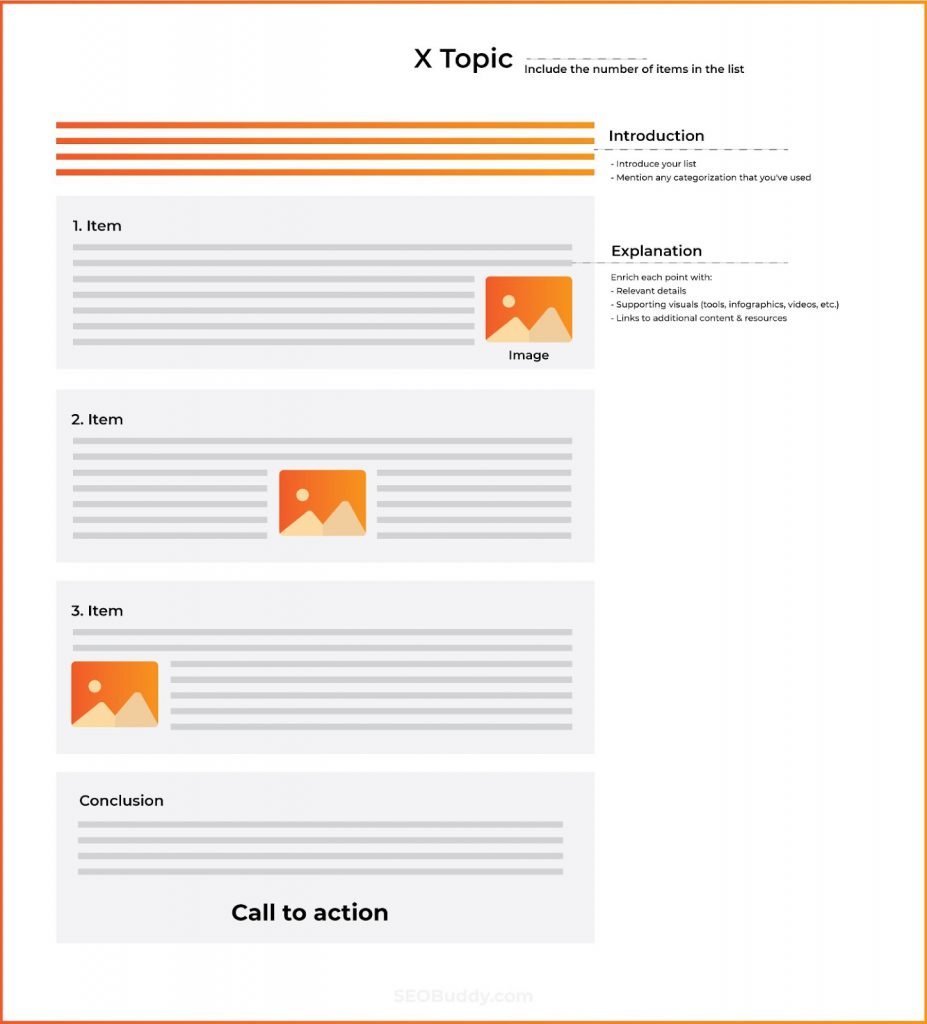
List-type blog post templates have a title, body (list of items), and conclusion.
Title of List-Type Blog Post Templates
Create a numbered title that aligns with the content you’ll be creating, such as “X ways to (achieve the desired outcome) or “X (tools) for (the purpose they solve).
Make it more compelling by including a power word.
This is a word that persuades the audience to read the article by evoking their emotions. A few examples are “beware”, “painful”, “crazy”, “awe-inspiring”, or “phenomenal”.
See this title of a list post on SmartBlogger. The word ‘sanity-saving’ is a power word.

It evokes fear in the readers and gets them wondering “will I lose my sanity if I don’t read this post and use the recommended tools?”
As you use power words, it’s important to avoid using click baits. These are overly emotional titles that don’t reflect the actual point of the article.
Here are a few other tips to help you write a great title:
- Begin with the number of items you have on the list
- Include your primary target keyword
- Clearly tell readers what they can expect from the post
Introduction of List-Type Blog Post Templates
You don’t want to wear your audience out with a long introduction.
Begin with a hook. Show your readers why they should read the post.
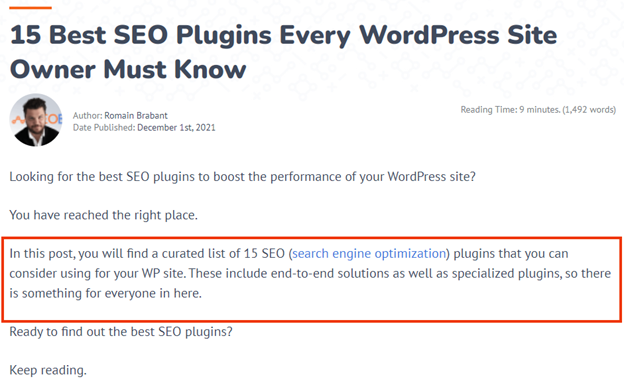
Give them a brief overview of the topic. If there’s a special categorization you’ve used in the list post, clearly explain that.
Here is an example of how we’ve done it in a listicle on the best SEO plugins for WordPress websites.
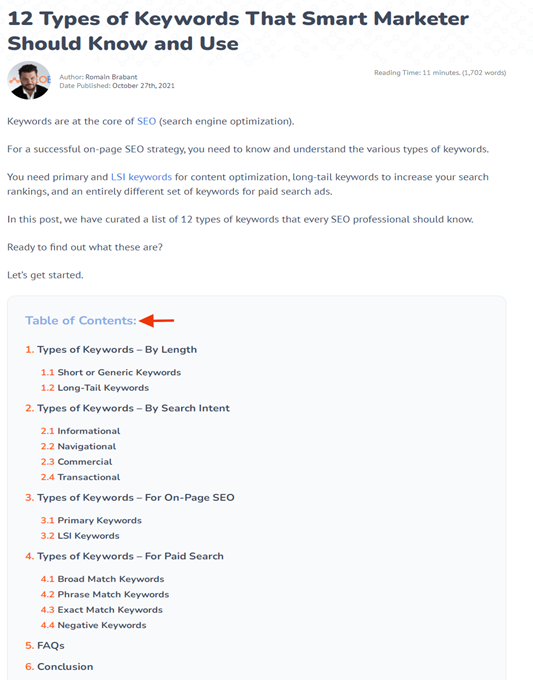
It’s also recommended to add a hyperlinked table of content. It’ll give your audience a chance to skip to the items they’d want to look at first.
Place it below the introduction like in this listicle on types of keywords.
The Body of List-Type Blog Post Templates
After the introduction comes the body of the content that, in this case, will have the list of items, along with their descriptions.
Each item should be a numbered heading (H2). Numbering the items helps the readers keep track of their progress when reading. It also encourages them to complete the article.
Try to make your list headers descriptive. Instead of listing “Exercise” as a weight loss tip, say “Boost Your Metabolism with Regular Exercise.”
It will grab the readers’ attention and encourage them to read the details.
You can also use long-tail and related keywords in your list headers.
Enrich the description of each point by adding:
- Relevant and exciting details about each item
- Supporting visuals, such as screenshots of the tools, infographics, and videos
- Links to additional content that provides more details to the readers
Where possible, divide listicles that are longer than 20 into categories or themes.
Here is an example.
See how we’ve categorized the items in this list of 200 Google ranking factors into 8 categories.
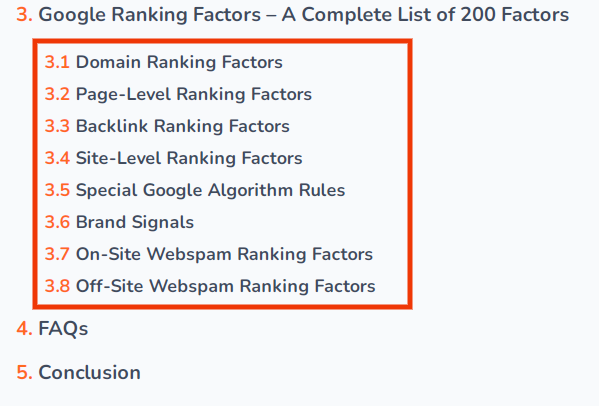
It makes the list less overwhelming for readers.
Conclusion of List-Type Blog Post Templates
There are plenty of ways you can conclude your list post:
- Give one or two key takeaways that’ll help the readers put your content to action.
- If you have a product or service that relates to your listicle, promote it in a natural way. You can, for example, show the readers how they can use this tool in combination with the information you’ve provided.
- Encourage readers to look at other related topics and content, and add links to these articles.
- Ask the readers to share their thoughts on the post or questions in the comments section and engage them in a conversation.
Tips for Writing Great List Posts
How do you create great posts using list-type blog post templates? Here are 4 tips.
Tip 1: Maintain Consistency
A good listicle is consistent from the title to the conclusion. Ensure the number of items in your body match the number promised in the title.
It’s also important that each point is relevant to the main topic. Also, try to maintain a similar length for each point.
Tip 2: Research and Find More Items Than You Need in Your List
When doing your research, do comprehensive research and find all the possible items that you can add to your list. Make a rough list of more items that you plan to add.
This provides an allowance to make any last-minute changes, such as:
- Scraping off ideas that aren’t strong enough
- Merging items that make a stronger point together
- Getting rid of items that aren’t the best fit for the topic
Tip 3: Use Examples
There are a lot of shallow list posts out there.
Be sure to explain your points adequately using real examples. If you can’t find real examples, hypothetical ones will also work.
Including real examples in the content makes it easier to understand and more interesting for the readers.
Tip 4: Order Your List Logically
You don’t need to arrange your list posts chronologically. But it’s important that your list flows from one idea to the next or shows some sort of logical organization.
For instance, if your list is for 10 top mobile phones, you can move from the most popular to the least popular.
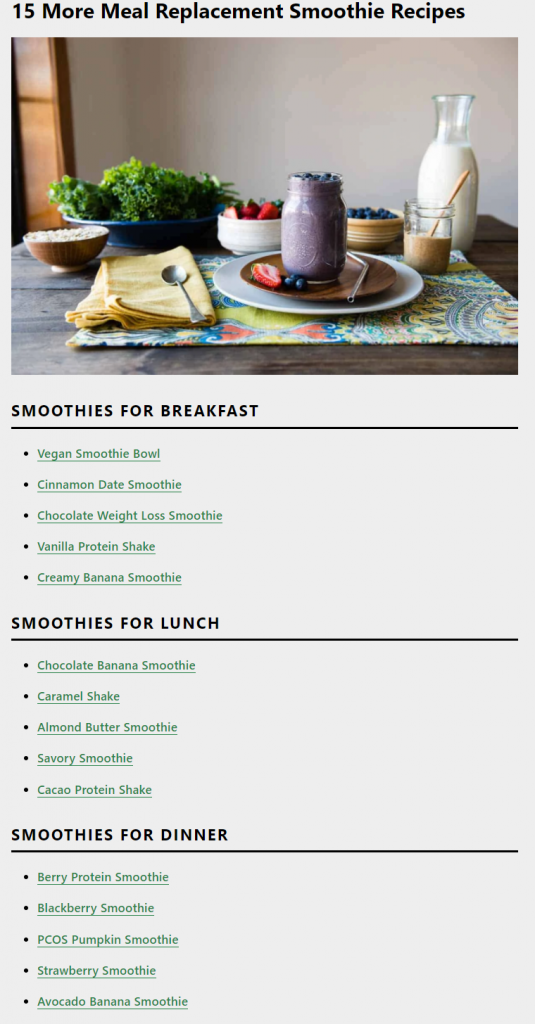
Or if it’s a list of best smoothies, it makes sense to start with breakfast smoothies and end with dinner smoothies as Simple Green Smoothies has done it.
Tip 5: Be Wise When Choosing the Number of Items
When selecting the number of items to include in your listicle, it’s a good idea to check the pages that are ranking on search engines results pages (SERPs) for the keyword.
If the top pages have 30 items and above, having 5 items in your list will reduce your chances of ranking. Your target audience will also click on the seemingly ‘richer’ listicles.
But as we always say, quality supersedes quantity.
It’s better to have 20 quality items where you do thorough research on each item than 100 shallow points that provide little value to the readers.
3. The Expanded Definition Blog Post Templates
Expanded definition blog post templates are great for writing great informational content that explains a concept.
They answer a “what” question.
A common challenge with these blog posts is that users find quick answers in Google’s featured snippets. They don’t even need to look at the first result on the SERP.
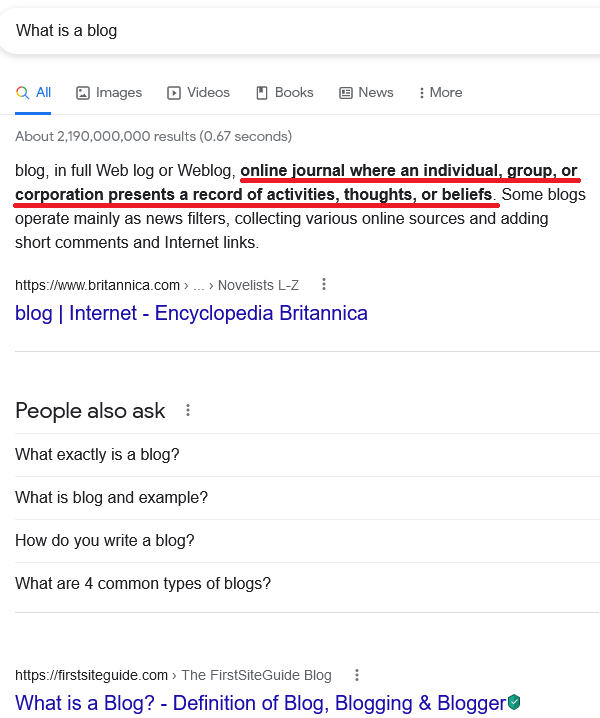
Here is an example of a featured snippet that answers a “what is” search query.
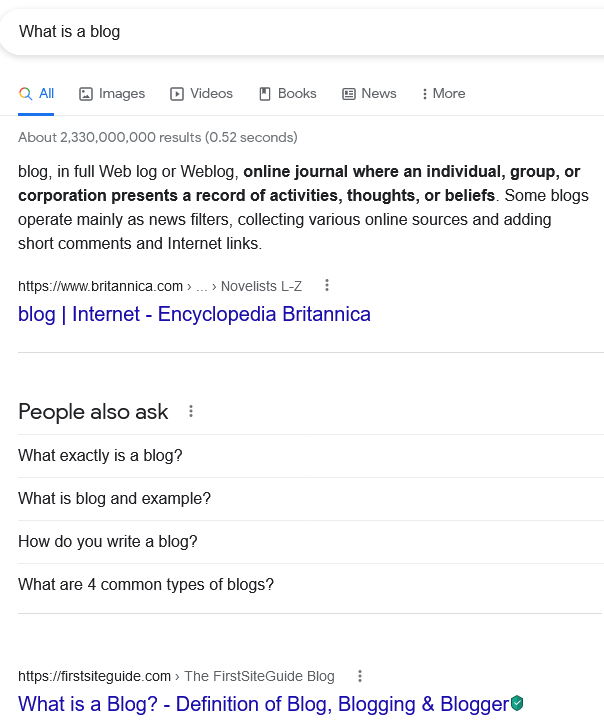
That’s why expanded definition blog posts tend to have low click-through rates.
But despite this challenge, you can still win with expanded definition blog posts by choosing a complex topic.
Choose a question that can’t be answered in a few sentences or a topic that can’t be explained in brief. For such topics, people will make the effort to read your post.
When can you use expanded definition blog post templates?
Use them when writing for a regular audience who might find it hard to understand the ins and outs of a specific subject without getting some context first.
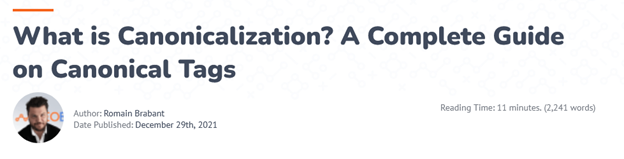
For instance, if you’re writing for a beginner audience about canonicalization, they’ll need to understand what canonicalization is before they read about more in-depth content pieces. And this is where expanded definition blog post templates come in handy.
Elements of Expanded Definition Blog Post Templates
Expanded definition blog post templates have a title, introduction, explanatory paragraphs, and conclusion.
The Title of Expanded Definition Blog Post Templates
The title of an expanded definition blog post template begins with “what is”. You can then expand the title based on your topic.
Here are some title ideas:
- What is (concept)? A Beginners Guide
- What is (concept) and How Can You Use It?
- What is (concept) and Why It’s Important?
- What is (concept) and How Can You Create One?
The Introduction of Expanded Definition Blog Post Templates
The audience is probably ready to learn about the concept and get quick answers. So, keep your introduction brief.
You can write a short opening paragraph that provides some context on why the readers could be interested in this question. Ask them a question they can relate to or mention a challenge they may be facing.
And then go straight to the definition or direct answer to your “what is” question.
You can either answer the question in the introduction or under an H2 heading.
We know you’re eager to have your definition featured on Google SERP or at least get a high ranking for your post.
Here is what you can do.
Make your definition concise. It should take not more than two paragraphs.
Search “what is (concept)” on Google. If there’s a featured snippet, include the bold keywords in your definition.
But only use them if they fit in your definition naturally.
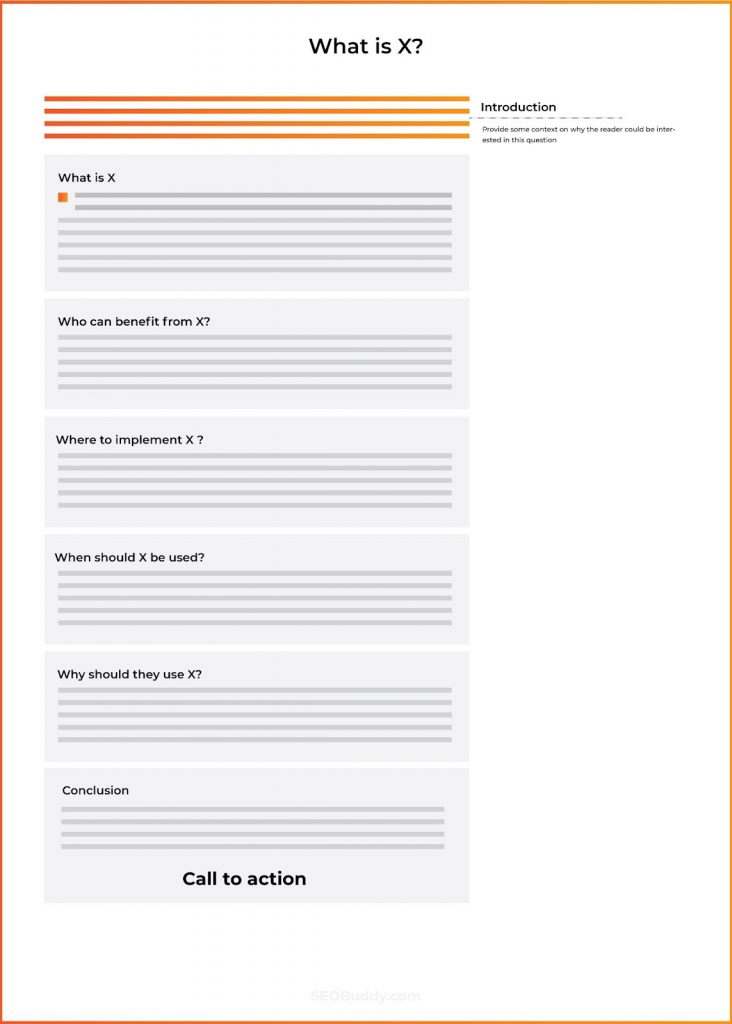
Explanatory Paragraphs in Expanded Definition Blog Post Templates
Once you have the definition, elaborate on the topic in the subsequent content.
Answer the questions the readers may have about the topic under various section headings. Here are some examples of the kind of headings you can add:
- Who can benefit from X?
- Where should they implement X?
- When should X be used?
- Why should they use X?
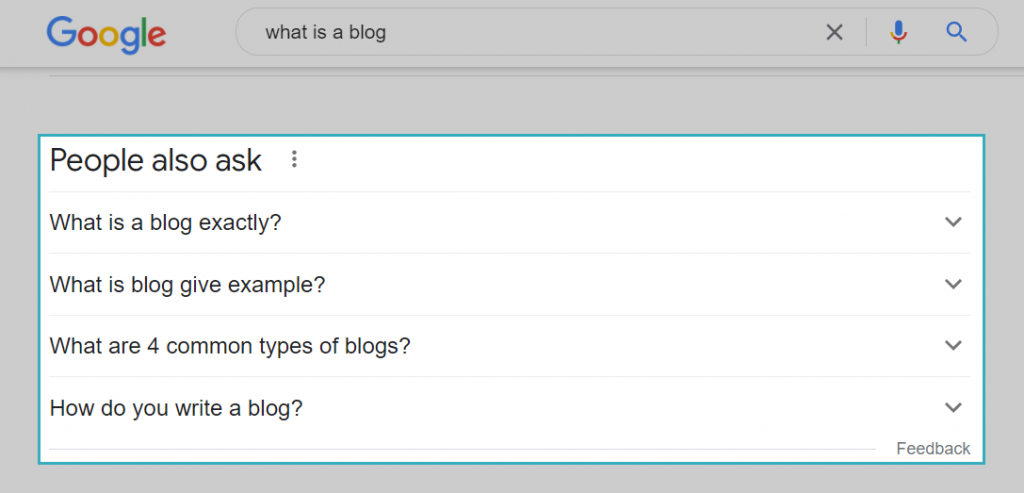
Find more of these questions in the “people also ask” section of Google and answer them through your content.
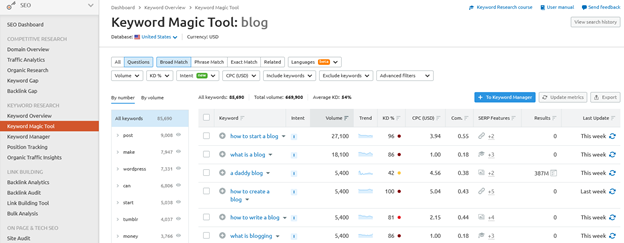
You can also use Semrush to find additional questions you can address. Choose the relevant questions under the Questions tab of the Semrush Keyword Magic Tool.
Conclusion of Expanded Definition Blog Post Templates
Once you’ve explained the topic thoroughly, mention the interesting findings of the post in brief. Explain how the readers can apply this newly-acquired knowledge.
You can also add links to other related content or more resources on the same topic.
Tips for Writing Great Expanded Definition Blog Posts
Let’s see how you can create engaging posts using expanded definition blog post templates.
Tip 1: Deliver What Your Title Promises
There is nothing wrong with adding something extra to the “what is” title, such as “What is (concept) and how will it transform your business?”.
But if your copy doesn’t follow through with the promise made in the title, the readers will feel cheated and you’ll lose their trust.
Tip 2: Choose a Topic in Your Niche
Write about a topic you’re familiar with and that relates to your industry. You can only do justice to such posts if you have prior knowledge on the subject.
Tip 3: Make It Simple for the Readers
The readers come to your website to learn. Make your post easy for them to understand. Here’s how:
- Explain unfamiliar concepts using familiar examples that the average person can relate to.
- Replace complex words with simple terms anyone can easily understand.
- Use images, videos, and infographics to make complex topics easier to understand.
4. Blog Post Templates for a Beginner’s Guide
The blog post templates for a beginner’s guide help you create educational resources for people unfamiliar with a topic.
Such guides tell people everything they need to know about a topic without overwhelming them with complex details.
Beginner’s guides help you build links and engagement. Your guide should:
- Provide clear definitions in simple language without industry jargon
- Set the context around the topic before going in-depth
- Contain relatable illustrations and rich examples
- Break down large concepts into who, what, when, and how sections
Here is an example of a beginner’s guide to a ketogenic diet.
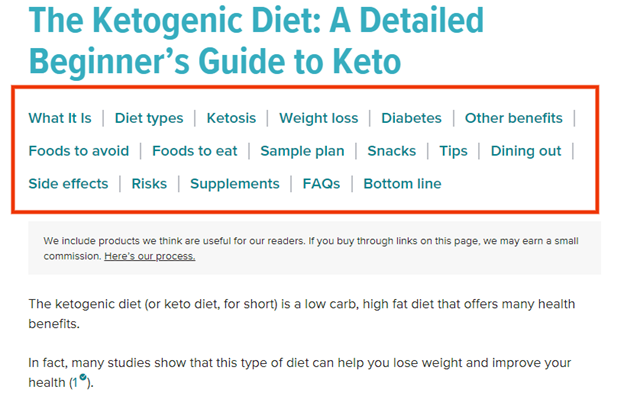
It explains what a keto diet is, different types of keto diets, benefits of keto diets, side effects, tips, and more.
Elements of Beginner’s Guide Blog Post Templates
Beginner’s guide blog post templates have an explanatory title, introduction, body, and conclusion.
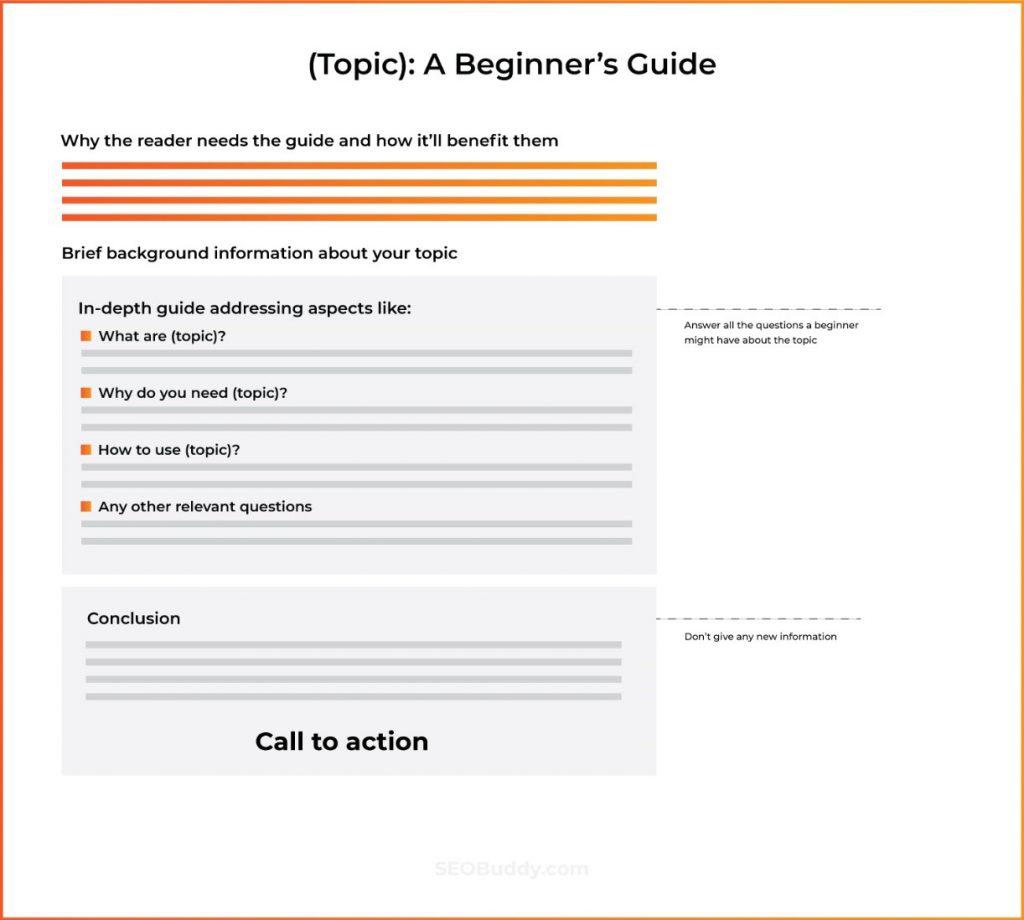
Title of Beginner’s Guide Blog Post Templates
The title in a beginner’s guide blog post template has the word “beginners”.
Here are some ideas:
- (Topic) for Beginners
- (Topic): A Beginner’s Guide
- How to (Topic): A Beginner’s Guide
- The Beginner-Friendly Guide to (Topic)
Remember you’ll be using the beginner’s guide blog post template to introduce a complex topic to newbies. So make your title clear and simple.
Introduction of Beginner’s Guide Blog Post Templates
Use simple language right from the first word of your introduction. It’ll reassure the readers that your guide isn’t packed with complex jargon.
A beginner’s guide introduction should show the readers why they need the guide and how it’ll benefit them.
Give them a reason to read through your long blog post by providing a preview of the wisdom you’re about to impart to them
However, remember to keep your introduction brief and to the point.
The Body of Beginner’s Guide Blog Post Templates
Some of your readers may be completely clueless about the topic.
Begin with some background information so that they’re on the same level as the rest of the readers.
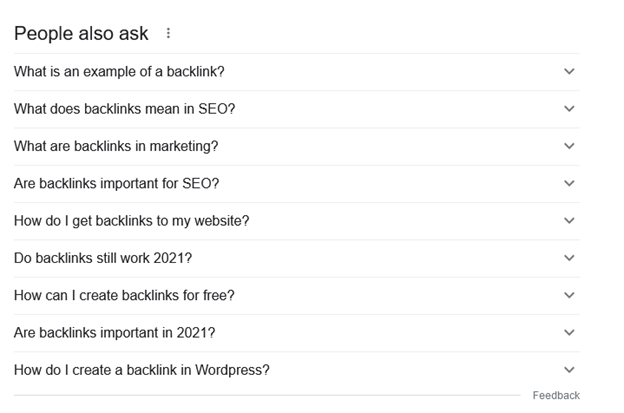
Next, address all the questions a beginner might have about the topic.
Each question should be under an H2 heading. For instance, if your topic is on backlinks, address:
- What are backlinks?
- Which are the best backlinks?
- Why do you need to build backlinks?
- How do you get the right backlinks?
Check Google’s “people also ask” section for more questions.
You can also check the high-ranking pages for inspiration on sections you can include in your post.
Find out what makes their content good.
If they’re using a lot of examples, images, or steps in their post, make yours even better. It increases your chances of ranking on the first page of Google SERP.
For questions that contain lengthy answers, use H3 and H4 headings to break them down into subsections.
Great content hierarchy makes it easier for the readers to follow your content.
In your content body, be sure to:
- Give as much information as you can on the topic.
- Provide content that helps the readers take the first steps towards their goal.
Conclusion of Beginner’s Guide Blog Post Templates
Start your conclusion with a summary of what the readers should know after reading your guide.
Be brief, and don’t give any new information.
Include a call to action, such as an encouragement to take the first step towards their goal.
You can also add a link to your service, product, or link to other pages on your website.
How to Write an Impressive Beginner’s Guide
Can you create awesome beginner’s guides using blog post templates?
Yes. Here are some tips to create great content.
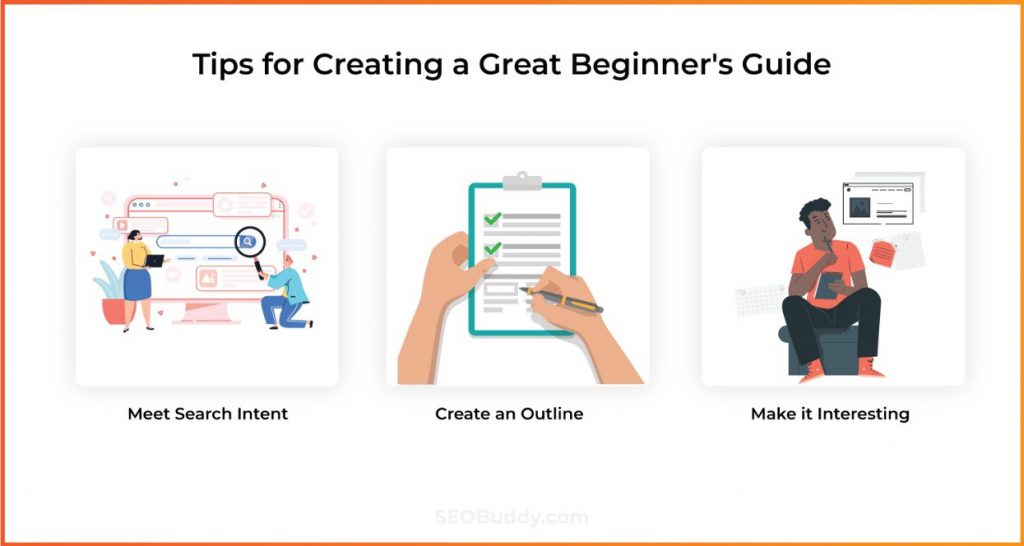
Tip 1: Meet Search Intent
Search intent is the goal a person has in mind when looking for answers online. Paying attention to search intent ensures that the content in your beginner’s guide is relevant to the readers.
Meeting search intent can also improve your rankings.
How can you identify search intent?
Type your main keyword in Google’s search bar and analyze the kind of content ranking websites have. According to Google, these ranking websites meet search intent.
See the questions they answer and issues they address, and match these in your content.
Tip 2: Create an Outline
Beginners’ guides are comprehensive, and it’s easy to digress from the topic.
That’s why you should always create an outline first. Do your research and determine your level 3 and level 3 headings. Briefly mention what you’ll cover under each heading.
Once you have your outline, fill it with high-quality content.
Tip 3: Make It Interesting
Most guides are long. And it’s easy for your readers to get exhausted. Here is what you can do:
- Write short paragraphs of no more than three lines.
- Open your sections with interesting questions to engage your readers.
- Use transitional words and phrases to create a logical flow.
- Use a subheading after every few paragraphs.
5. Comparison Blog Post Templates
Comparison blog post templates help you write content targeting people at the end of their buyer’s journey.
This is the state where they compare similar products or services and make a purchase decision. And comparison posts help them with that.
You can create posts to compare your products to your competitors’ and show what makes your products better. Or compare any list of products to help your blog audience.
For instance, if you’re in the SEO industry, you can compare Ahrefs and Semrush and help your audience choose the right tool.
You can also compare two classes of products, such as whey protein vs. plant protein.
For comparison blog posts, it’s important to:
- Compare equivalent features
- Put biases aside, even when your product or service is involved
- Give an in-depth look at the features that matter
Readers love comparison blog posts because they keep them from spending money on a solution that’s not right for them.
Elements of Comparison Blog Post Templates
Good comparison blog post templates contain an introduction, details about the products being compared or their brief reviews, comparison of equivalent features, and a conclusion.
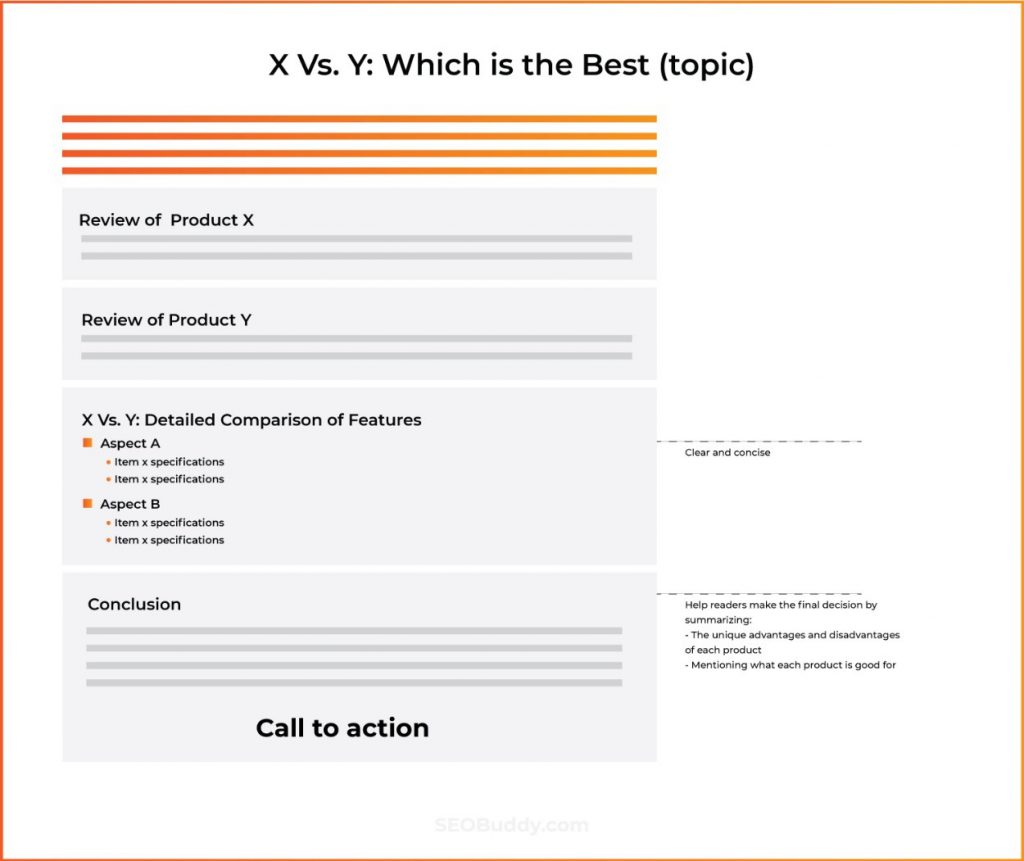
Title of Comparison Blog Post Templates
Add the names of products being compared and also indicate what the products do.
For example, “Ahrefs Vs. Semrush: Which is the Best SEO Tool for Your Website?”
Include your main keyword. In our example, it could be “best SEO tool or even “Ahrefs vs. Semrush”. This also tells your readers that you’ll be looking at the tools in the context of SEO.
Introduction of Comparison Blog Post Templates
You don’t have to spend time defining terms or providing background information about the topic.
Anyone searching for such terms is probably interested in the products or services being compared. So they already have some knowledge about the topic.
You can start with a question, and provide some context on why the readers should read the comparison post.
Mention the essential details that will guide your analysis, such as cost, ease of use, and advanced features.
Here’s an example of how HubSpot does it.
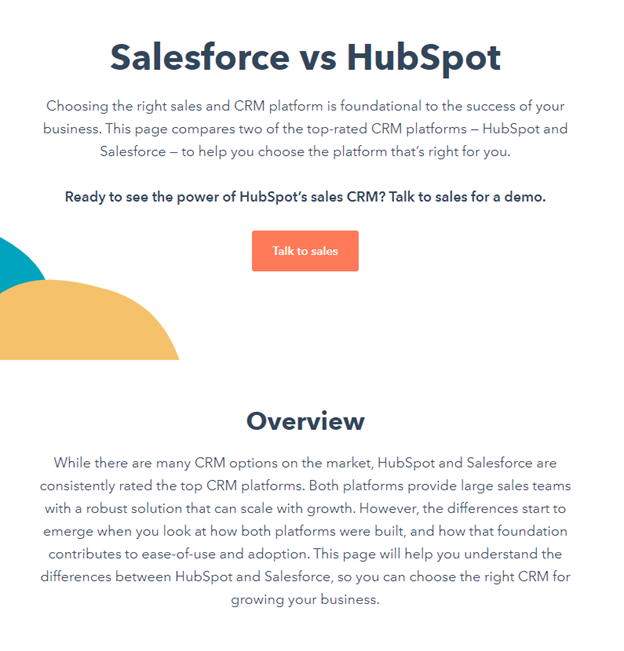
Don’t write a long intro as the readers would want to get to the comparison straightaway.
Body or Product Comparison Section of Comparison Blog Post Templates
A good structure is important in helping your readers get the most out of your comparison posts. Not just readers, but search engines as well.
So make your posts scannable by dividing it under multiple headings and subheadings, and using bullet points. In this case, these would be the specific features or aspects on which you’re comparing the products or brands.
Also, some readers will only be interested in specific sections of your comparison post. Make it easy for them to find what they need.
Your descriptions should be clear and concise and readers should be able to easily compare equivalent features of both products.
There are several arrangements in comparison blog post templates that can help you structure your work.
Here is one structure. It focuses on one product at a time instead of a side-by-side comparison.
What is X?
- Aspect a
- Aspect b
- Aspect c
What is Y?
- Aspect a (equivalent)
- Aspect b (equivalent)
- Aspect c (equivalent)
Here is another structure. It focuses on a side-by-side comparison of features.
What is X?
What is Y?
X Vs. Y: Features Comparison
- Aspect A
- Item x specifications
- Item y specifications
- Aspect B
- Item x specifications
- Item y specifications
- Aspect C
- Item x specifications
- Item y specifications
Choose the structure that works best for you and aligns with your message.
But we would recommend the second structure. It gives readers a direct side-by-side comparison of the features and makes it easier for the readers to make a choice.
Conclusion of Comparison Blog Post Templates
The summary of a comparison blog post comes down to choosing the superior product.
You can use one of these ideas:
- Show the readers how to make a choice between the products
- Show the significant advantages and disadvantages of each product
- Show which option is better suited for a specific situation or use-case
- If there is one product that’s suitable for everyone, recommend it to the readers
How to Write an Excellent Comparison Blog Post
Here are some tips on how to use our blog post templates to create resourceful comparison posts.
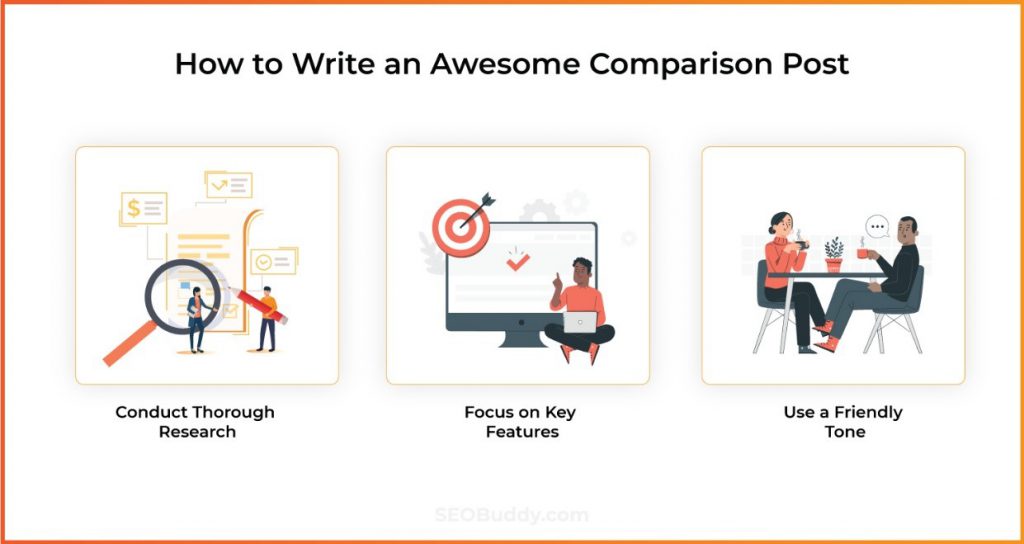
Tip 1: Conduct Thorough Research
Research by looking at testimonials and testing the products yourself. This will help you provide intricate details that’ll be helpful to the readers in making decisions.
If you’re comparing two laptop models, for instance, provide details like speed, storage capacity, and product dimensions.
Tip 2: Focus on the Most Important Features
Don’t overwhelm the readers with too much information. Focus on the key’ deciding factors.
These deciding factors are the features and qualities buyers look for when choosing such products.
Tip 3: Use a Friendly Tone
When writing comparison posts, you should write as you would talk to a friend.
Avoid jargon or language that average readers wouldn’t readily understand. Find a way to present your facts while keeping things light.
6. Expert Roundup Blog Post Templates
Expert roundup blog post templates offer a quick and easy way to provide your audience with experts’ opinions on a subject.
These experts could link back to your blog post or promote the post on their social media accounts. This does not just build links but also helps build brand awareness and boost traffic to your website.
Using expert roundup blog templates requires less writing, but the quality and usefulness of such posts are still high.
Elements of Expert Roundup Blog Post Templates
While the structure for such posts is similar to all others, the main difference lies in the body of the content. In this case, the body will have expert quotes on a particular topic.
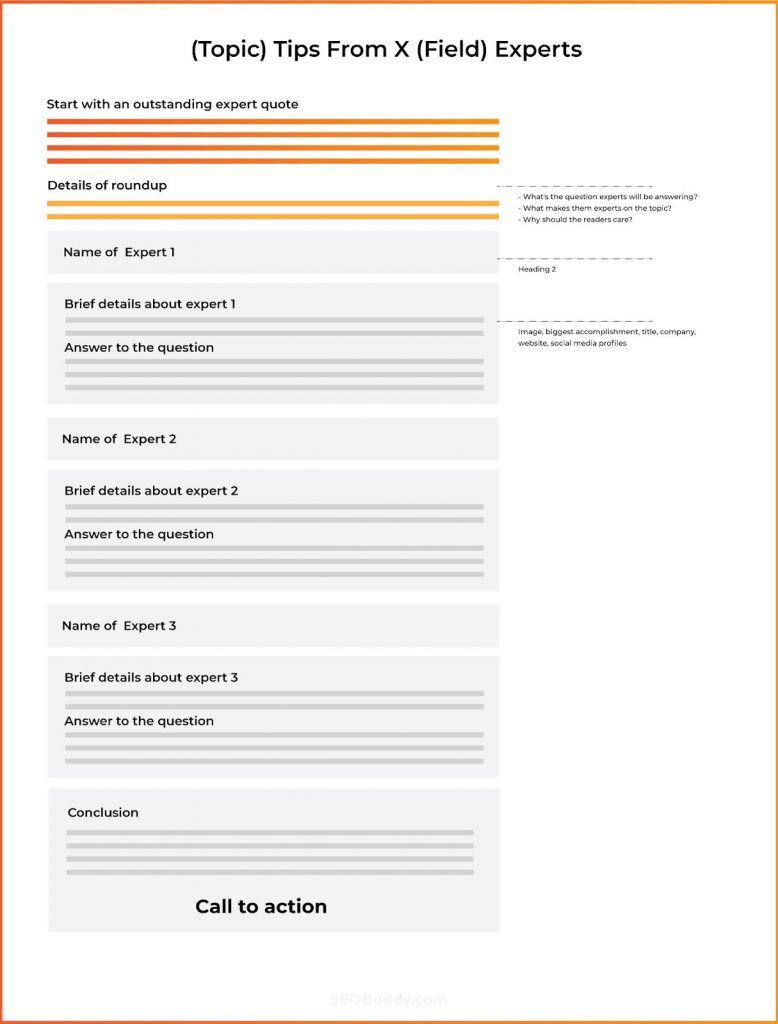
Title of Expert Roundup Blog Post Templates
The title of your expert roundup blog post template should indicate the number of experts you’ll feature.
It should also tell their area of expertise and the topic they’ll be addressing.
Consider this title, for instance.

Before even reading the post, the readers already know there are over 20 marketing experts sharing their opinion.
And the topic is social media marketing tips that are most suitable for 2022.
You don’t have to use the words experts. Words like “pros” and “thought-leaders” are just as effective.
Introduction of Expert Roundup Blog Post Templates
Get your readers interested by starting your introduction with an expert’s quote.
Then, provide brief overview of:
- What the post is about; mention the question experts will be answering.
- The expertise of the people you interview.
- The reader’s problem that your roundup is seeking to address. Tell the readers why they should care about your roundup.
You can add a table of contents after the introduction. This makes it easy for the readers to skip to the expert quote they’re most interested in.
Body of Expert Roundup Blog Post Templates
Assuming your answers are already in text format, lay it out on your template.
Use interesting H2 headings that make it easy for readers to skim the content. This can be a one-liner quote from the expert or their name.
You can introduce the expert briefly before sharing their opinion, such as mentioning their biggest accomplishment. Share their image, title, company, website, and reference their social media profiles.
Next, write their response to your question.
Make it easier for your audience to share their favorite quotes on social media by creating picture quotes with click-to-share buttons.
Conclusion of Expert Roundup Blog Post Templates
Write a compelling conclusion and make it actionable by including the most important tips from your expert submissions.
Include a call to action. If you have other interviews, ebooks, or webinars that are relevant to your roundup, add a call to action with a link to these resources.
How to Write a Good Expert Roundup Blog Post
Here are some tips to getting the most out of expert roundup blog post templates.

Tip 1: Reach Out to the Right Experts
The bigger the names you can have in your roundup, the more successful it’s likely to be. But that doesn’t mean relevance should take a backseat. Instead, get quotes from people who truly are experts on the topic.
Also, choose experts who will proactively share your post and have a relevant audience you want to reach.
Tip 2: Pick the Right Question
Remember that your experts are busy and receive tons of expert roundup requests from your peers.
So pick a question that they’ll want to answer. Easy, but original and interesting.
The question should also be specific. A limited scope means they can give shorter, but more valuable answers.
Ensure the question relates to a problem your audience is struggling with. This will generate interest in your post.
Tip 3: Don’t Forget Your Keywords
You’ll be doing less writing and more collating for such posts. But this doesn’t mean you can’t rank for some great keywords and related keyword phrases.
There’s plenty of room to include them in your title, introduction, and conclusion. Use an SEO tool to conduct keyword research and choose the right keywords and their related keywords.
How to Choose the Right Blog Post Templates
With several blog post templates to choose from, choosing the right template for a blog post can get tricky.
While it’s clear that certain blog post templates fit perfectly for some topics, you may get confused about some others.
In such cases, do a Google search to see the type of blog posts that are ranking for your target keyword.
These ranking blog posts will give you an idea of the search intent. They’ll provide guidance on the type of blog post and answers your target audience is searching for.
A Google search for the short and generic keyword “SEO” shows that the person searching for it is probably new to the term.
It’s most likely that they want to learn the basics of SEO. They’re not looking for a list of SEO tools or an in-depth guide on advanced SEO tactics.

For such keywords, you’re better off using beginner’s guide or expanded definition blog post templates.
Now it’s time to discover the other 102 steps that will get more organic traffic flowing to your website. Get the SEO Checklist here.
Want to get a sneak peek of what it looks like?
Enter your email and get a free demo version of the SEO Checklist.
FAQs
1. What is a blog post format?
A blog post format is the structure of a blog post that helps you arrange your content within the post.
It makes the post more scannable and readable, and clearly conveys the most important points to the readers.
By using blog post templates you get the right format for each type of blog post and ensure that your ideas flow in a structured manner.
2. How can I create blog post templates?
To create your blog post templates, think about the direction you want your ideas to take. Separate these ideas into sections separated with distinct headers.
Alternatively, you can simply use the blog post templates mentioned in this post.
3. What is the layout of a blog post?
The layout of a blog post is the way in which your content is arranged. It depends on the type of blog post. Step-by-step guides, for instance, have a different layout from comparison blog posts.
Using effective blog post templates ensures the layout of your posts enhances the post’s readability and appearance.
4. What do blog post templates look like?
Blog post templates structure your work in a way that leads the readers smoothly from the introduction of the main content to the CTA, where they are likely to convert.
Blog post templates organize your content using:
- A catchy title
- An introduction
- A body that’s divided into sections with distinct headers that depend on the type of blog post
- A conclusion
Blog post templates essentially look like skeleton structures or outlines of a post.
5. How do you make a good blog layout?
Ensure that the layout enhances the flow of your ideas. It should make your blog post neat, readable, and visually appealing.
Using blog post templates ensures that every post hits a high mark in conveying the essence of a post to the readers.
6. What are the 5 easy steps to write a blog post?
To write a great blog post:
- Choose a topic and use an SEO tool to find the best keywords to target. Go for a topic that might convert readers into customers down the line.
- Define your target readers.
- Search the topic on Google. See the type of posts ranking for the topic. It’ll guide you on the type of blog post templates you should use to meet search intent.
- Do thorough research and create a blog post outline.
- Start writing an engaging blog post and include lots of visuals. Proofread your content after you finish writing.
7. Does Canva have blog post templates?
Canva provides graphics you can add to your blog post templates. It provides blog banners, blog title images, and other images to make your blog posts visually rich and engaging. But no, it does not provide blog post templates.
Optimize Your Writing Process with Free Blog Post Templates
As long as you have a message that relates to the interests of your target audience and is relevant to your industry, our blog post templates make it easier to turn it into a reader-friendly and compelling article.
Keep in mind that these blog post templates are not written in stone and can be customized to your specific needs.
They’re here to get you started, not obstruct your creativity. Customize them according to your industry, message, and content marketing needs.
You can also mix elements of different blog post templates as you see fit.
For instance, include a step-by-step guide in an expanded definition blog post to enhance your message and the readability of your post.Want to generate more search traffic for your website using a robust SEO strategy? Connect with our team and we’d be happy to help.
CEO & Founder at SEO Buddy


Great article! These templates seem interesting.