How to Leverage Google Keyword Planner to the Maximum for SEO
Wondering how you can leverage Google Keyword Planner for SEO and find the right type of keyword?
Google Keyword Planner is one of the most versatile tools when it comes to SEO.
Want to know the best part? It’s free to use. No strings attached.
What about the data quality?
Can you even question it when it’s coming right from the largest search engine in the world?
Whether you’re just starting on your SEO journey or have been there a while, you must know how to use Google Keyword Planner the right way.
Let’s get started.
Google Keyword Planner: Why Should You Use it?
Google Keyword Planner is perhaps one of the most underrated SEO tools in the market even though it has numerous advantages for users.
Whether you’re creating new content or upgrading old content, keywords play an important role everywhere. This, in turn, underscores the importance of keyword research tools like Google Keyword Planner.
Here are a few reasons why you should consider using Google Keyword Planner:
✔ 100% Free to use
✔ Access to accurate search volume data
✔ Ability to find keywords using competitors’ URLs
✔ Location-specific keywords are also available.
✔ Accurate Google Ads bid pricing (low and high bids)
✔ Possible to export all the keywords in CSV format
✔ Data on ranking competitors
✔ Advanced filters to find the exact keywords.

Now that you know why it helps to use Google Keyword Planner, let’s take a look at how you can start leveraging it.
How to Create a Google Keyword Planner Account (For Free)
If you know how search engines work, you’d know how important keyword research is. And that, in turn, makes a Google Keyword Planner really important.
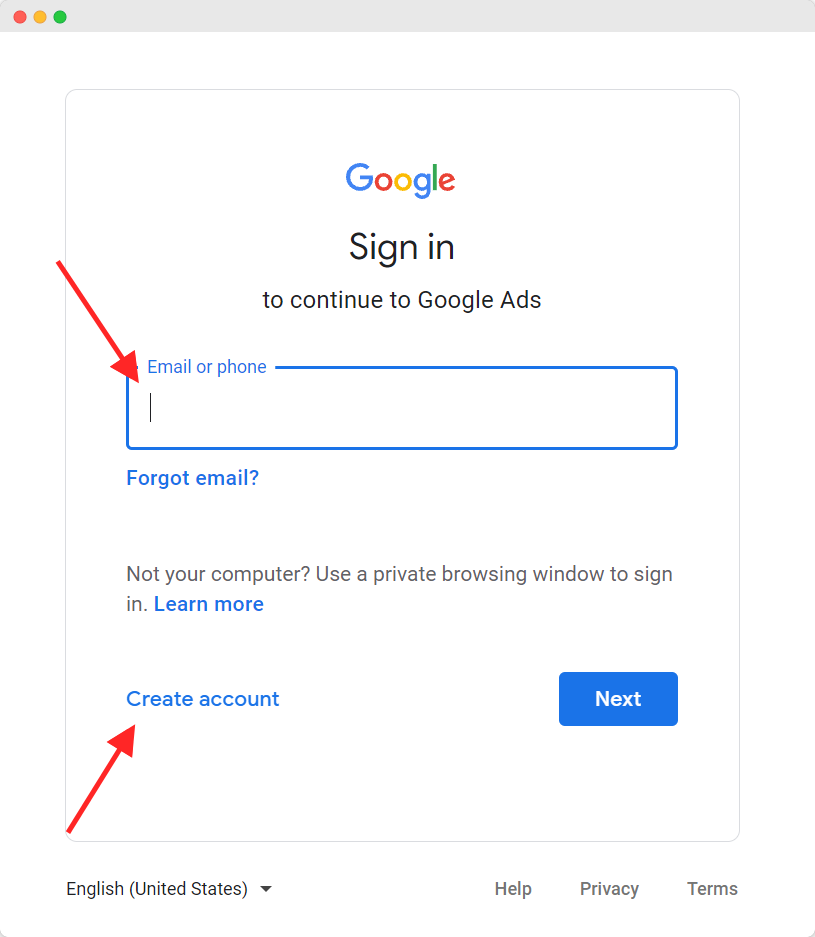
To get started with Google Keyword Planner, you can head to this link. If you already have a Google account, you can log in using the same. Alternatively, you can create a new Google Ads account too.
On the upcoming pages, you’ll be asked for some information about yourself and your business, including its website.
Google may also ask you for billing information. If it does so, don’t worry. You’ll only be billed if you run any ads, not for using the Google Keyword Planner.
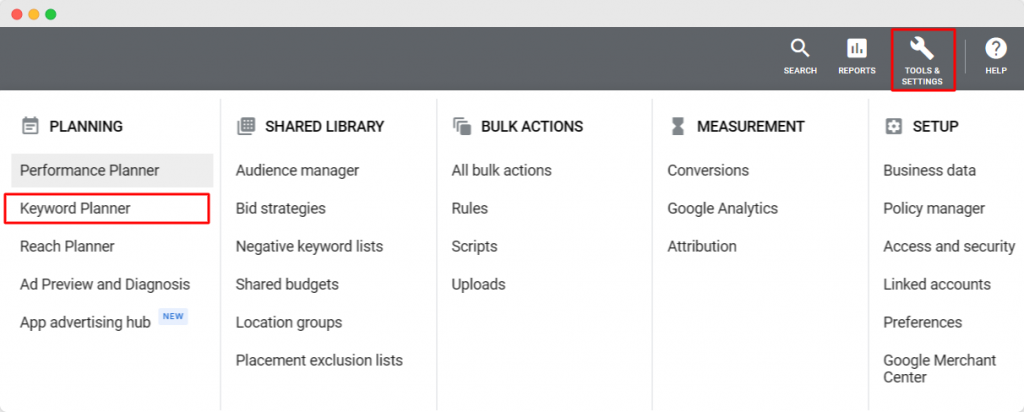
Once you’ve completed the sign-up process, you’ll land on the main page. There, you can click on “Tools & Settings” to open a dropdown menu. In that menu, you can click on Keyword Planner.
That’s all. Your Google Keyword Planner account is set up and you’re ready to start finding keywords for your website and incorporating them in your content for better on-page SEO.
How to Use Google Keyword Planner
Finding keywords for your content is one of the first steps in improving your SEO. To find out the other steps, check out this SEO checklist that covers all important aspects of SEO.
Once you click on “Keyword Planner”, you’ll see two options: “Discover new keywords” and “Get search volume and forecasts”.
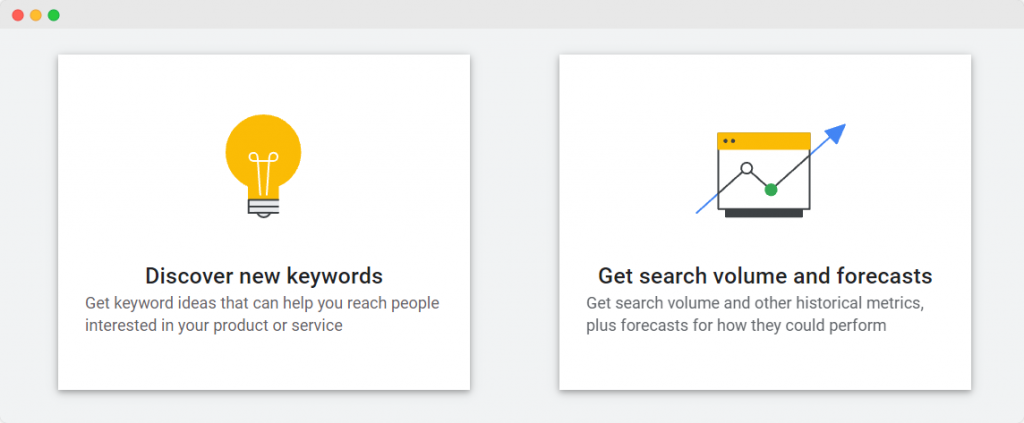
The first option lets you find new keywords based on the primary search term that you input. On the other hand, the second option showcases the search volumes for keywords along with other historical metrics and provides future forecasts as well.
The first option is the one that we will discuss in this post. So let’s get started by choosing it. You’ll get a screen that looks like this:
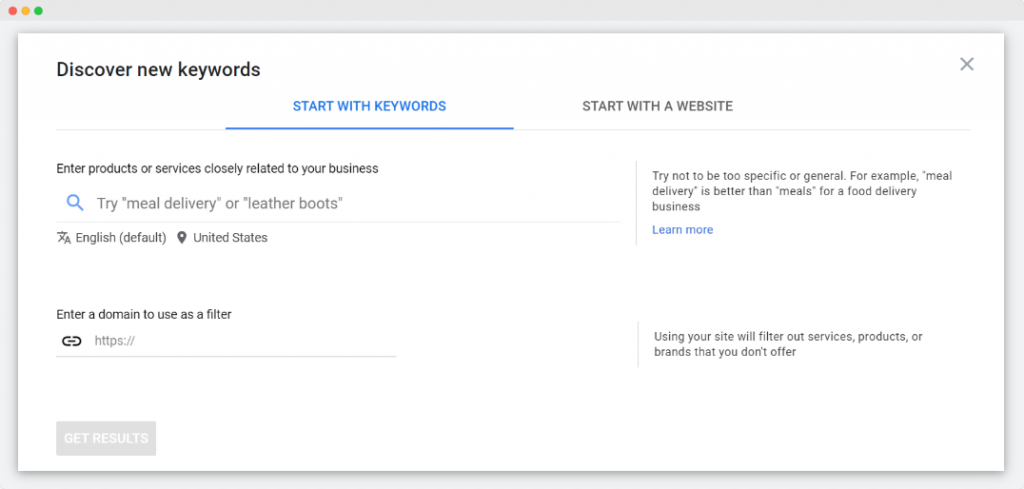
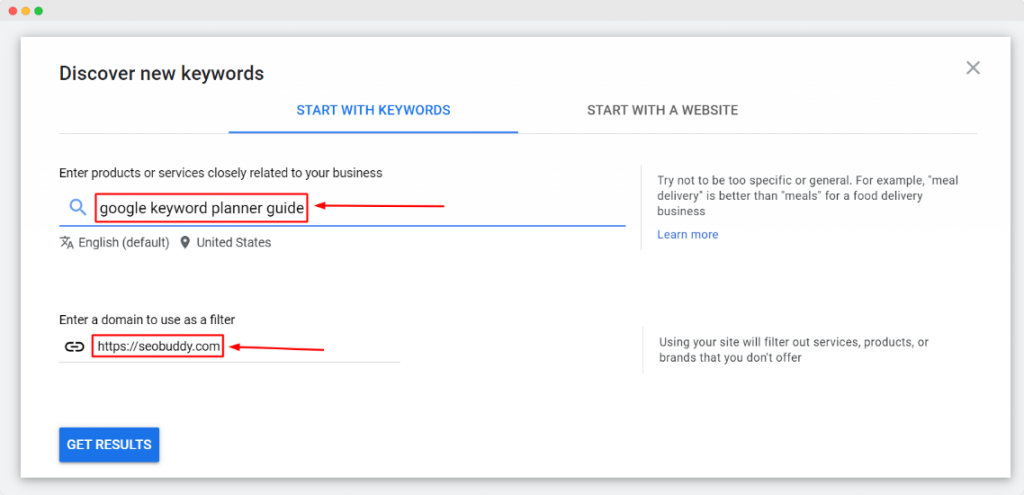
Here, you’ll have two options: “Start with Keywords “and “Start with a Website”. The first option helps you discover new keywords for your content based on the primary keyword that you enter.
The second option comes in handy when you want to learn all about the keywords that your competitors are currently ranking for. It’s a great starting point for competitor analysis.
Let’s first explore the first option.
Start with Keywords
In the search box that appears, you can enter primary search terms related to the products, services, or topics you’re targeting.
For instance, if you’re looking for keywords related to the post you’re reading currently, some of the search terms you can enter are:
- Google keyword planner guide
- Google keyword planner explained
A word of caution here — don’t be too specific when you’re entering the primary search terms. This would reduce the number of relevant keywords that Google Keyword Planner comes up with.
For instance, don’t use primary terms like:
- How can I use google keyword planner
- Steps to use google keyword planner
At the same time, try not to be too generic as that may show many unnecessary keyword suggestions. Here are a few examples of generic primary terms:
- Google keyword planner
- Keyword research
Instead, you could strike a balance between the two by using terms like:
- Google Keyword Planner guide
- Keyword research tools
What’s more?
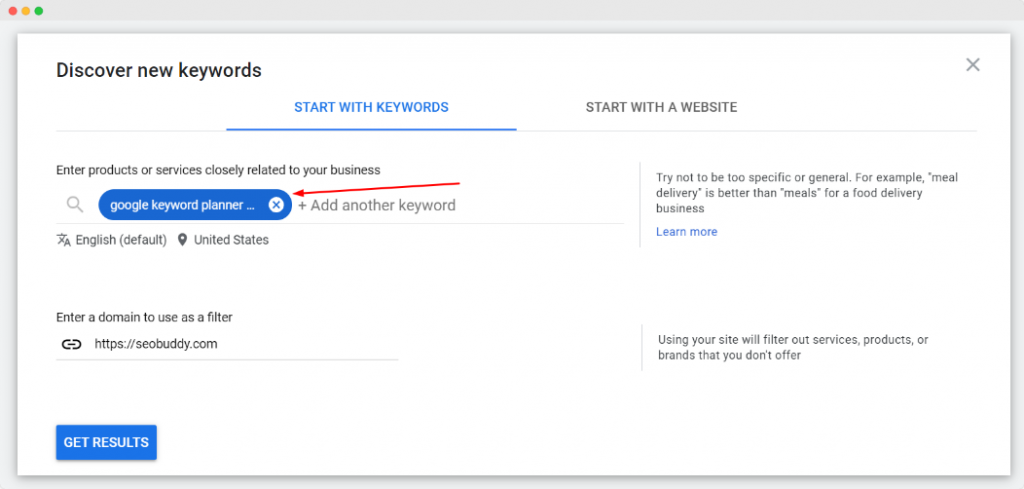
You can also filter the keywords based on a particular domain so that only those keywords that are relevant to your domain will appear in the list.
And guess what?
You can enter multiple primary terms to get an accurate list of related keywords. For this, all you’ve got to do is enter each primary term with a comma.
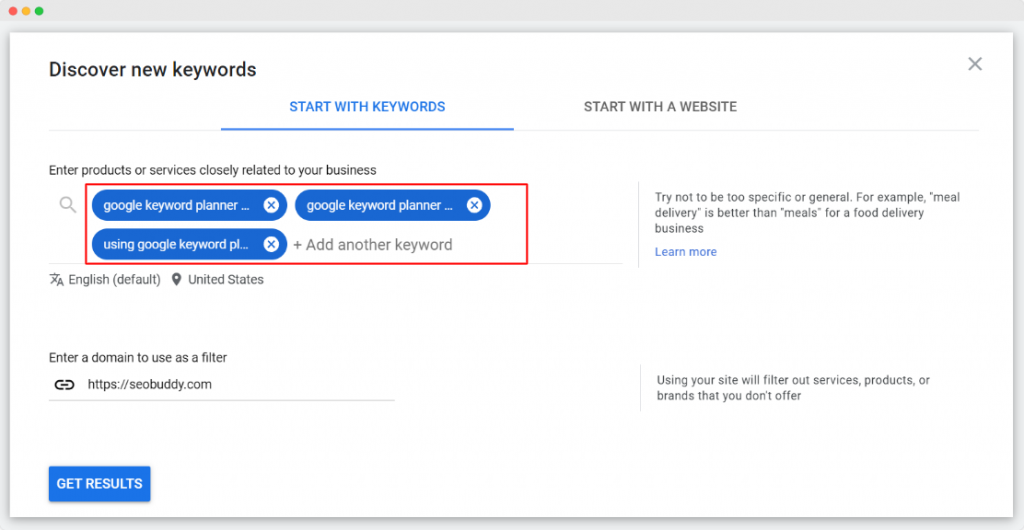
Before you click on the “Get Results” button, there’s still some work to be done.
Google Keyword Planner also gives you the option of language and location filters. This way, you can get keywords from your target language and location.
The location, in particular, is important as the data related to volume and ad bid rates depends on the locations you select.
To target a particular location, all you’ve got to do is enter its name in the box. You can enter the name of a city, state, or country here. On entering a location, you’ll also see the estimated reach that Google has for that place.
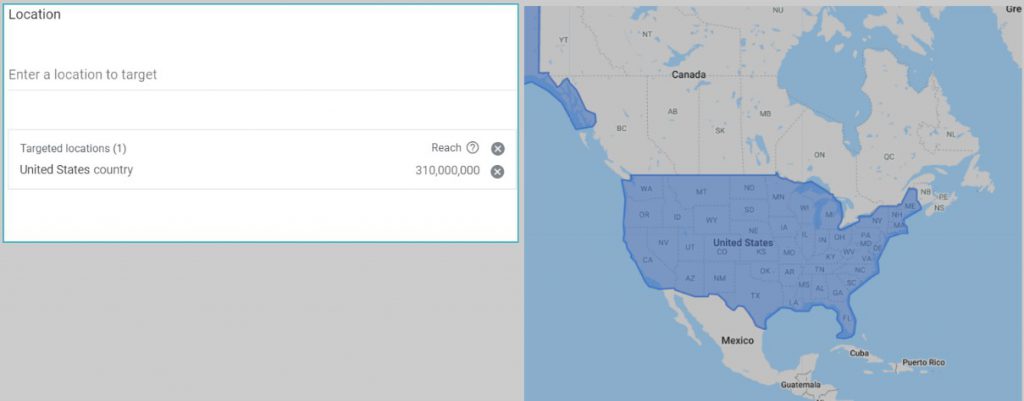
Once you’re done selecting your target language and location, go ahead and click on “Get Results”.
Keyword Results Page
Clicking on “Get Results” will bring up a page that lists down all the related keywords. There’s tons of data here so it can get overwhelming if you’re seeing it for the first time.
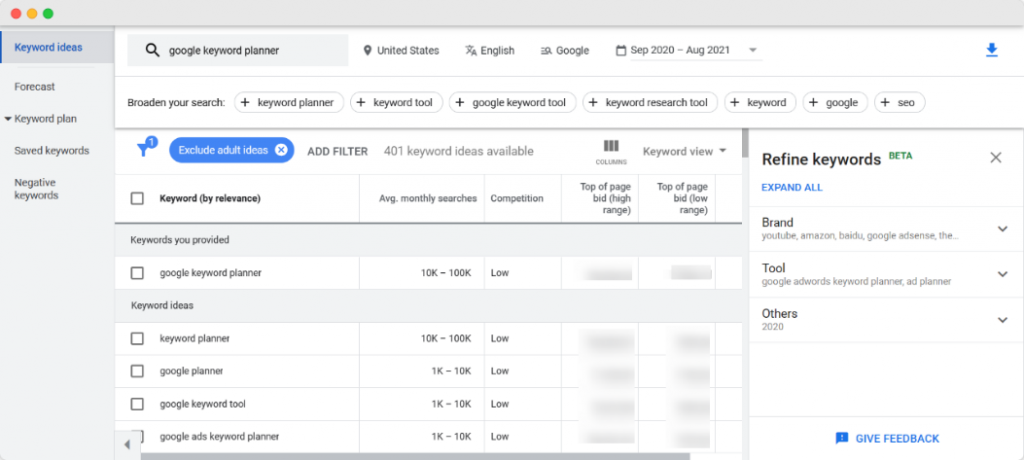
However, understanding the page is fairly easy.
Let’s start with the top-most section. This section shows you the information you’ve already entered in the search bar and you can further modify it from here.
Additionally, Google Keyword Planner suggests some related keywords here that you can add to your search to broaden the number of results.

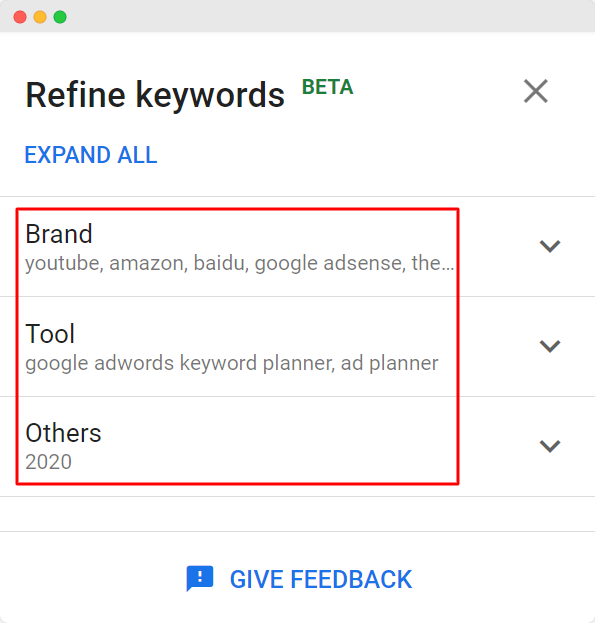
Towards the right, the “Refine Keywords” box showcases the various filters that you can apply to refine the keyword search even further. This can help you spot branded keywords, filter keywords by year, and more.
The center of the page is dedicated to the list of relevant target keywords and their metrics. This list shows the following:
- Keywords: These are the keywords that are related to your search terms and they’re sorted based on their relevance.
- Average monthly searches: Average monthly searches metric gives the average search volume for each of the keywords listed. It allows you to figure out which keywords you should target.
However, the biggest drawback here is that the search volumes aren’t very precise. Instead, you’d see a range like 10K-100K. - Competition: This shows you the level of competition for a particular keyword. The competition is divided into Low, Medium, and High. It’s easier to rank for keywords with lower competition.
- Top of the page bid (high range): This shows you the cost per click (CPC) that you’d typically have to pay to rank at the top of the paid results on the search engine results page (SERP) of this keyword.
- Top of the page bid (low range): This figure shows you the CPC that you’d have to pay to rank at the bottom of the paid search results on the keyword’s SERP.
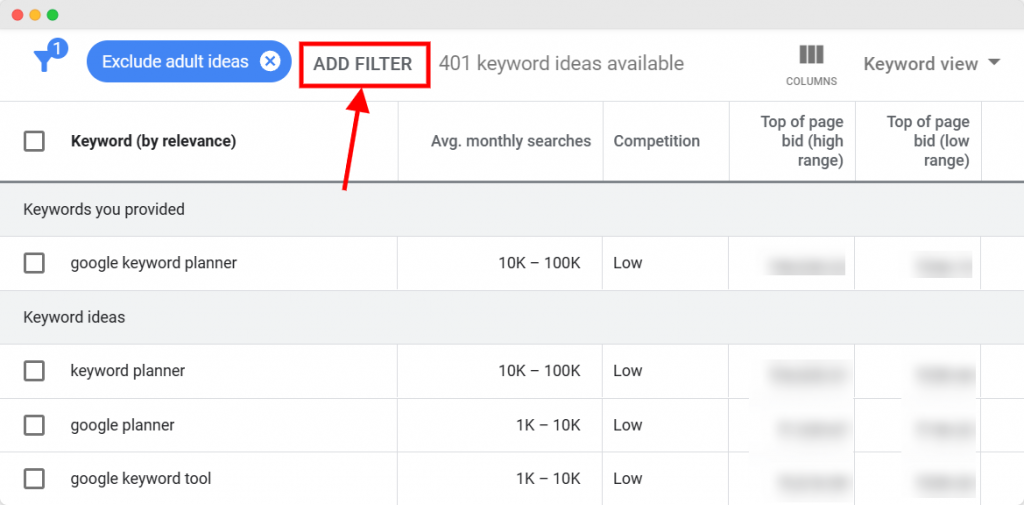
It also provides a wide range of filters to further refine your keyword list. Some of the filters include:
- Excluding keywords already in your plan
- Level of competition
- Bid ranges
- Organic impression share
- Organic average position
Start with a Website
Now that you know how you can do keyword research using the primary search terms approach, let’s take a look at how you can identify keywords through the domain/website method.
In this method, you’ve to start by entering the domain or the link to a particular page.
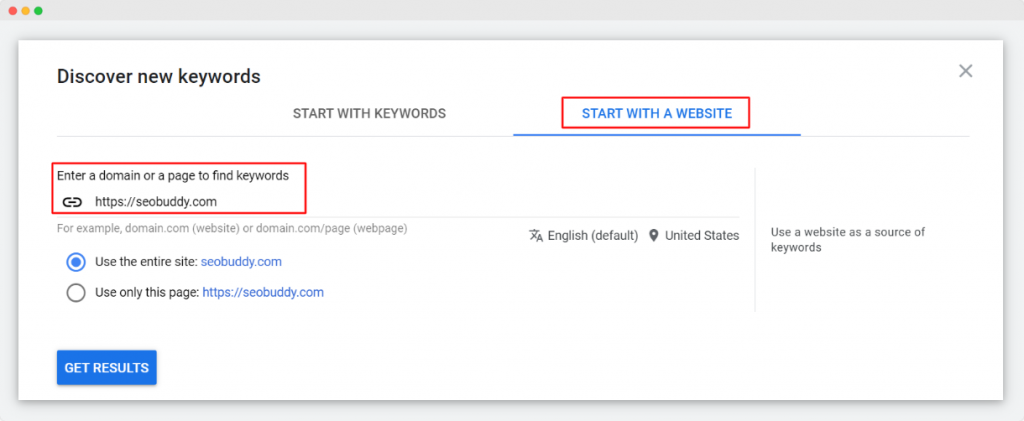
You can choose between using the entire site or a single page for analyzing the keywords.
Additionally, you can add filters for the country and language just the way you can do in the keywords approach.
Once you’ve selected the appropriate configuration, click on “Get Results”.
The page that comes up is similar to the one you’ve seen earlier and has the very same elements.
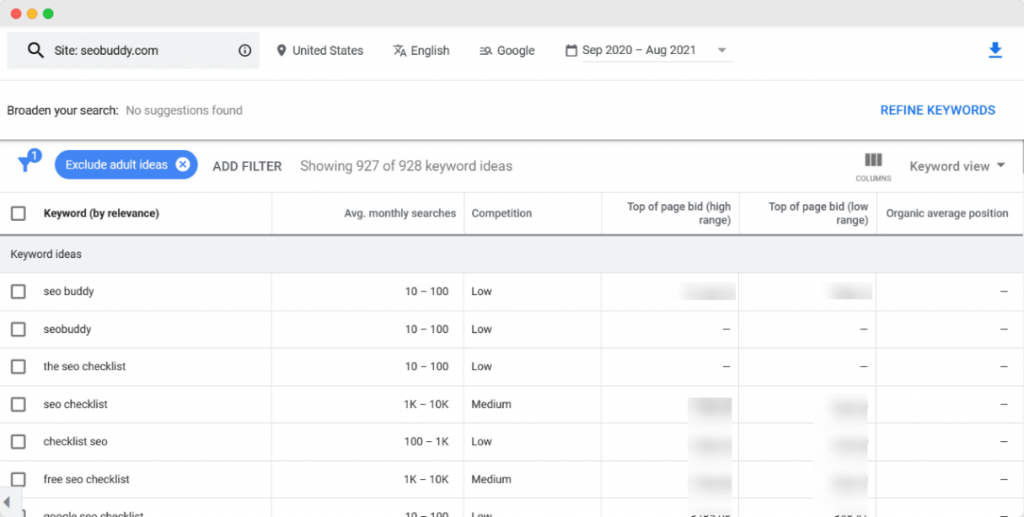
Pro Tip: This method works as an excellent way to identify the keywords that your competitors are ranking for.
Based on these, you can get new keyword ideas and start creating content around them. This, in turn, would enable you to outrank your competitors for those keywords.
How to Select the Right Keywords
Now that you’ve got an idea of how to conduct keyword research using Google Keyword Planner, you should learn how to select the right keywords.
Here are the various things that you should consider while selecting target keywords.
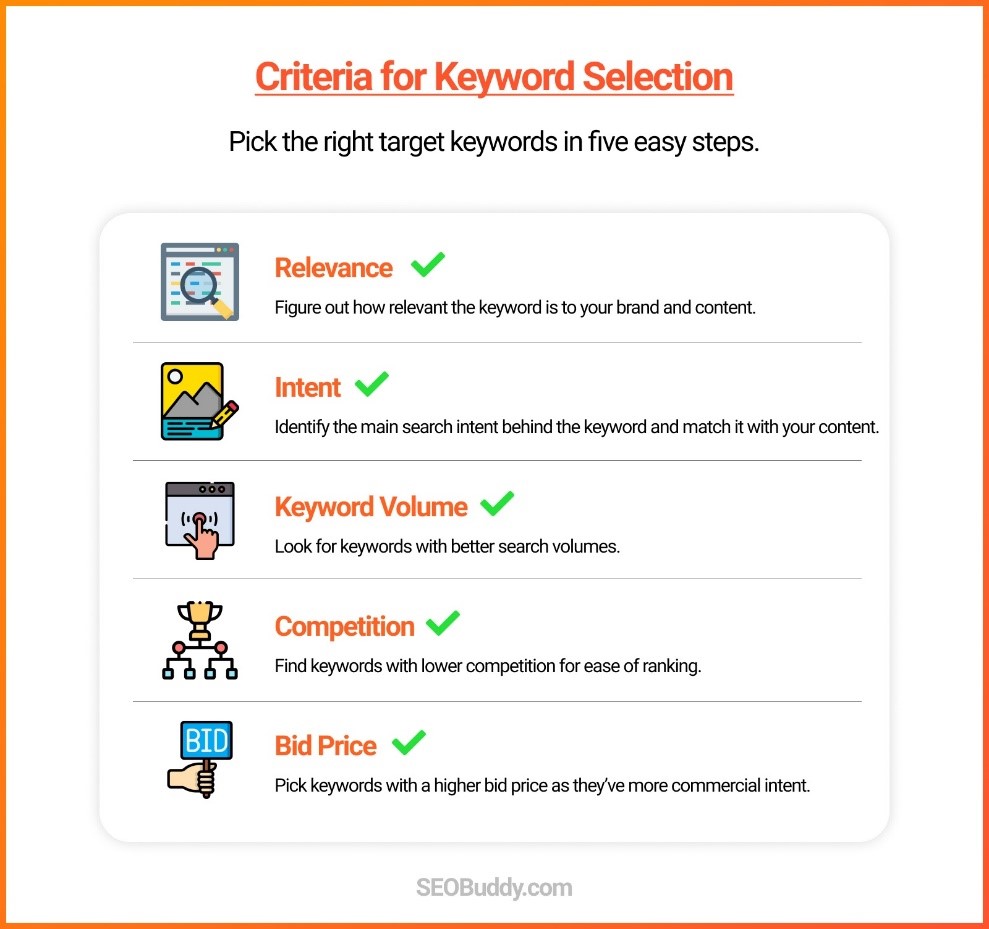
1. Relevance
The most important thing that you need to consider when selecting a keyword for your brand is its relevance.
Based on the primary search term that you’ve entered, you’ll likely find numerous keywords in the list on Google Keyword Planner. However, all of these may not necessarily be relevant to your brand.
This is where you’d require some level of manual effort. Even if your keyword list is sorted in descending order of relevance, you shouldn’t blindly pick up the first few ones. Instead, consider each keyword independently and analyze if it’s relevant for your brand.
Doing so is especially important if you’re running Google Ads as your ad quality score will depend on it.
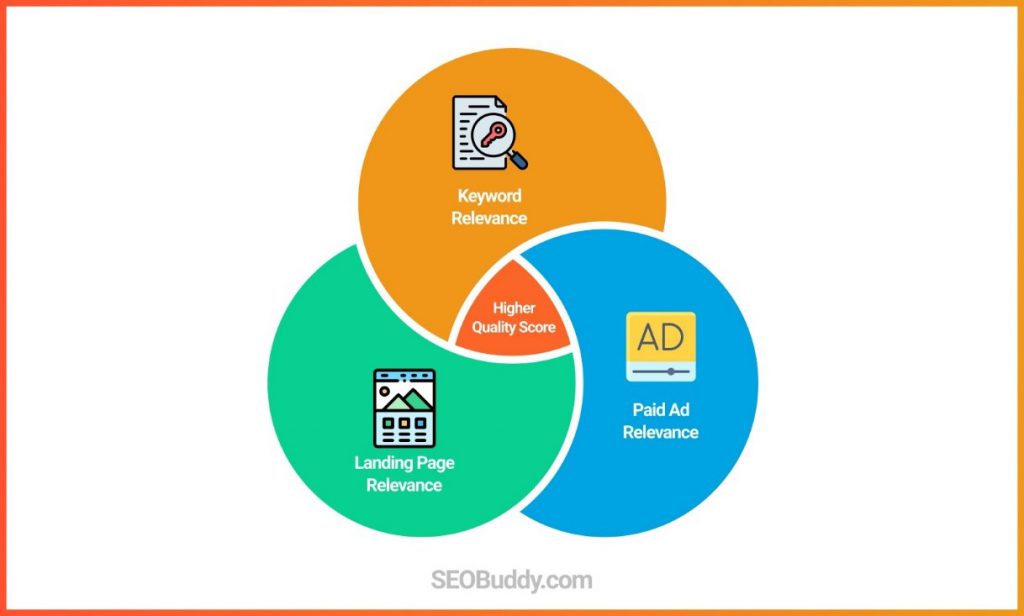
Pro Tip: If the keyword aligns perfectly with your content, it’s likely going to result in a higher quality score.
2. Intent
If you’re conducting keyword research for a particular content idea, you should also consider the keyword’s search intent. This is because each keyword addresses a different search intent.
Search intent is critical to the success of your content because it’s the whole idea behind your audience’s search query. If there’s a mismatch in the search intent and content, it’s likely that your content won’t rank well.
That’s why you must individually analyze each keyword and look for the intent behind it and create plagiarism-free content that meets the search intent.
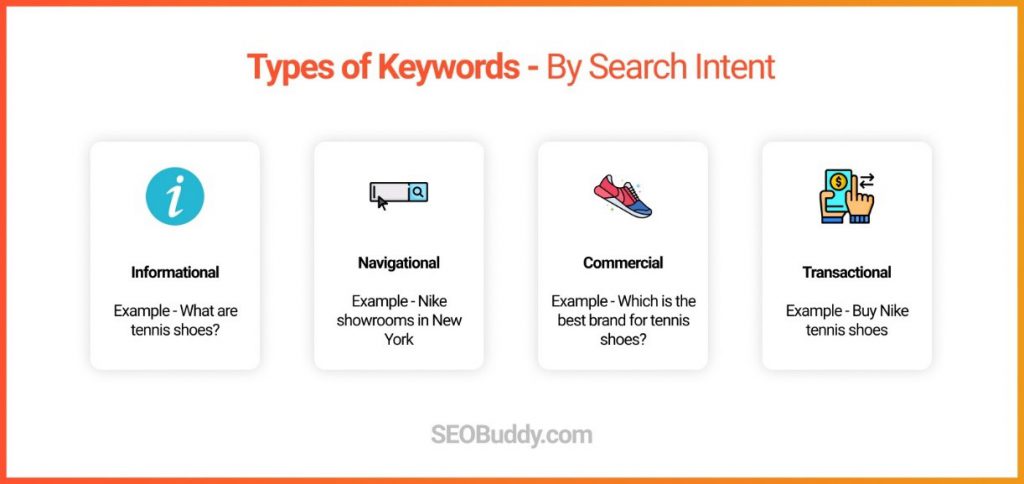
You can broadly divide keyword intent into four categories:
- Navigational: The intent behind these types of keywords is to locate a store or a website on the internet.
- Informational: These keywords are used to acquire information about a topic, product, business, etc.
- Commercial: The intent behind these keywords is to find the best products, services, or brands.
- Transactional: These are high-purchase-intent keywords that are used when a person is ready to buy something.
Pro Tip: Consider a mix of all four types of keywords to ensure that you have traffic for all sections of your sales funnel.
3. Keyword Volume
Yet another important consideration for keyword selection is the search volume for each keyword. As previously discussed, Google Keyword Planner doesn’t provide precise volumes. However, it does give the range of search volumes that can give you a fair idea of how many people search for the keyword each month.
Why is the keyword volume important?
The reason is simple—if you rank for keywords with higher volumes, you might be able to drive a lot of traffic to your website. On the other hand, keywords with low search volumes may not drive as much traffic.
You may spend a significant amount of time and money on content development so it makes sense to get the most out of your content by targeting keywords with a decent search volume.
Pro Tip: Consider selecting those keywords with lower competition and higher volumes. Alternatively, choose high-volume keywords if they’re matching your search intent.
4. Competition
Another thing that matters is the level of competition for each keyword. As mentioned before, lower competition means that it might be easier to rank for that keyword in the SERPs. On the other hand, the high difficulty would mean that it would be challenging to reach the top of the SERPs for those keywords.
Why?
It’s because several other prominent websites are already vying for the top positions for those keywords.
There are also the medium competition keywords where there’s a certain level of difficulty in ranking.
Your goal should be to spot keywords that have low competition but higher volumes. This is especially important if you’re just starting out.
Typically, long-tail keywords have lower volume and competition. On the other hand, short-tail generic keywords tend to have more volume and competition.

Pro Tip: Choose long-tail keywords to rank quickly in the SERPs and start building your traffic.
5. Bid Price
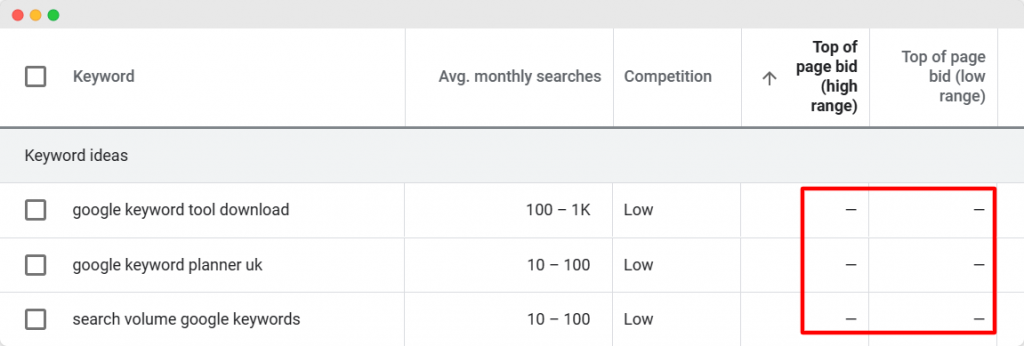
Finally, the last aspect that needs to be taken into account is the bid price. You’ll notice that there’s a wide variation in the bid price for different keywords in the list of keyword ideas.
In fact, some keywords may not even have any bid price displayed in Google Keyword Planner.
Why should you consider the bid price?
It’s because ranking on keywords with higher bid prices would be more lucrative for your business.
Higher CPC keywords would mean that the traffic coming to your website is more valuable monetarily. This would be valuable to increase your earnings, especially if you’re monetizing your website through Google ads.
On the other hand, if you’re planning to run Google Ads for your business, you should look for keywords with better search volume and lower CPC. This would help you minimize your ad costs and yet drive traffic to your website.
Pro Tip: High CPC keywords have more commercial intent. This, in turn, translates into more traffic from people who’re interested in buying from you. These keywords can directly boost your bottom line.
How to Organize Your Keywords
After selecting your keywords, you need to be able to organize them well. This is essential so that you can easily manage all your keywords instead of having them all over the place.
Thankfully, you don’t need to go to any other platform to organize your keywords. You can do it all in Google Keyword Planner itself.
There are two ways to organize your keywords.
- Including them in a master list (Add to Plan)
- Adding them to a custom group (Add to Ad Group)
Add to Plan
Once you’ve got the list of keywords, you can click on the box to the left of the keyword to select it. This will bring up the “Add to Plan” dropdown.
The Plan here is the master keyword list. You can click on the dropdown here to select the campaign that you want. This can come in handy to organize all the keywords for a particular campaign.

Once you’ve selected all the keywords, you can click on “Add Keyword to Plan”. However, make sure that you select “Exact Match” and not “Broad Match”.
Pro Tip: Using broad match would help you add the entire gamut of similar keywords to your plan. However, that would also mean that your ad would show up for a lot of keywords.
Add to Group
The other way of organizing keywords is by adding them to a particular ad group. These ad groups are groups of related keywords.
To add keywords to ad groups, you can click on the square box next to the keywords and then select the ad group to which you’d like to add them to.
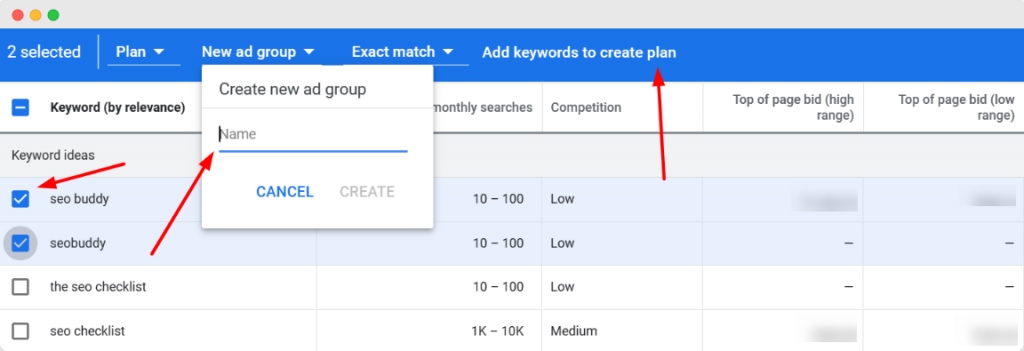
You can also create new ad groups by clicking on the dropdown button. Finally, you can choose between a broad or exact match and click on “Add Keyword to Plan”.
Pro Tip: You can group keywords of similar topics under one ad group to make it simpler to launch ads.
How to Choose Negative Keywords
Negative keywords are essential components of Google Ads and you can choose them through Google Keyword Planner.
But what exactly are they?
They’re the keywords that you don’t want your ad campaigns to show up for. In a nutshell, negative keywords let you select what not to target through your ads.
For instance, if you’re selling eyeglasses, your ad may still show up for other keywords related to glasses such as “wine glasses” or “window glass”.
You can add those keywords to your list of negative keywords so that your ad doesn’t show up for them. This can help in more efficient utilization of your ad budget.
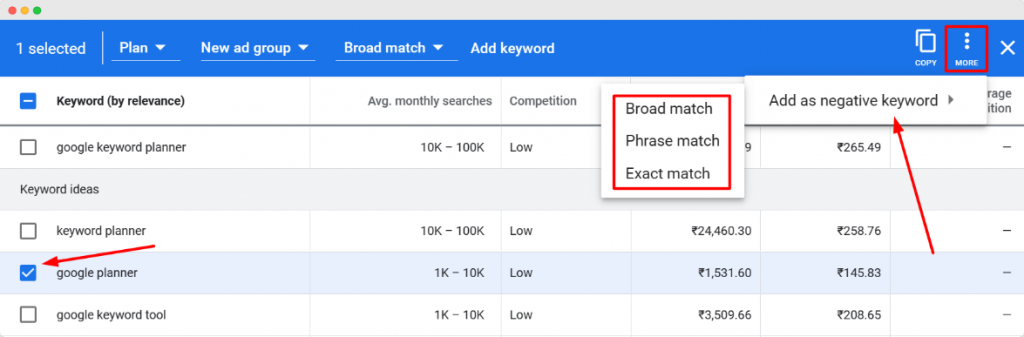
There are three types of negative keywords:
- Broad match: Ad won’t show up if all terms of your negative keyword are in the search term irrespective of the order.
- Phrase match: The ad won’t show if all the terms of your negative keyword are in the search term in the exact order.
- Exact match: The ad will show up for all searches except those where the exact negative keyword is used.
Based on your requirements, you can choose whether to add your negative keywords as broad, phrase, or exact match.
So, how can you select negative keywords using Google Keyword Planner?
The process is fairly simple — all you’ve to do is click on the box next to the keyword to select it. Once that’s done, you can click on “More” and select “Add as a negative keyword”.
Post that, you can select whether you want to add the keyword as a Broad, Phrase, or Exact match.
Pro Tip: Try using exact or phrase match negative keywords for efficient utilization of the feature. If you end up using too many negative keywords, it may limit the reach of your ads. The chances of this happening are greater with broad match negative keywords.
How to Get More Accurate Volumes
As mentioned earlier, Google Keyword Planner tool only shows you rough estimates for search volumes of each keyword.
Want to find more precise search volumes?
Well, there’s a way through which you can find that out. However, it would cost you some money.
You need to launch a campaign for the keywords you’re interested in. If you run Google Ads campaigns for a month, you’ll be able to see your ad impressions. This essentially would be the total search volume for that keyword.
Pro Tip: Running ads isn’t the most convenient way to find keyword volume. That’s why it helps to leverage another tool like Semrush or Ahrefs in conjunction with Google Keyword Planner for better keyword research.
FAQs
1. How do I access Google Keyword Planner?
To access Keyword Planner, you can head to ads.google.com and click on “Sign In”. Once you’ve logged into Google Ads, you can click on “Tools & Settings”. In the dropdown menu that opens, click on Keyword Planner to access Google Keyword Planner.
2. Can I use Google Keyword Planner for free?
Yes, you can. Google Keyword Planner is a free tool offered by Google and all you need to do is sign up for a Google Ads account to access it. You might be asked for your billing information but you won’t be billed unless you run a Google Ads campaign.
3. How do I get new idea keywords?
There are two main ways to get new keywords on the Google Keyword tool. The first method involves entering a few primary search terms into the box. Based on these terms, a list of relevant keywords will show up. You can choose the best ones from that.
The other method works well to find keywords your competitors are using and ranking for. You can start by entering the domain of your competitor and Google Keyword Planner will come up with a list of keywords relevant to them. From there, you can choose the best ones for your brand.
4. How does Google keyword planner work?
Google Keyword Planner works on the concept of providing relevant keywords based on primary search terms you enter or keywords relevant to a particular domain. All you have to do is open it and enter the primary keywords or your competitors’ domains to get started.
5. Is Google Keyword Planner accurate?
Yes, Google Keyword Planner is very accurate as the data comes directly from Google. However, the search volumes are rounded off and put in brackets of tens, hundreds, and thousands. As a result, you wouldn’t get the most precise estimates from it directly unless you run ads.
Now it’s time to discover the other 102 steps that will get more organic traffic flowing to your website. Get the SEO Checklist here.
Want to get a sneak peek of what it looks like?
Enter your email and get a free demo version of the SEO Checklist.
Get Started with Google Keyword Planner
Google Keyword Planner is one of the finest, if not the most versatile keyword research tools out there.
It lets you find keywords relevant to your brand based on certain primary search terms you enter. Additionally, you can find keywords that any domain is ranking for.
From this list of keywords, you can choose the right ones for your brand by filtering them out based on their relevance, volume, competition, and bid price.
That’s not all!
You can also organize these keywords into different Ad Groups and Ad Plans.
Finally, to get accurate search volumes, you can consider running ads for each keyword and look at the impressions generated.
Need more help with your SEO effort? Check out our SEO checklist that covers all important aspects of SEO that you need to work on to improve your rankings.
Also, feel free to ask any questions you may have on the topic by leaving a comment.
CEO & Founder at SEO Buddy