Your Ultimate Technical SEO Checklist
Having a technical SEO checklist is important if you want to improve your rankings in the search engine results pages (SERPs).
And this is more important than ever now with the increasing number of internet users in the world.
As of January 2023, there were 5.16 billion internet users in the world, representing 64.4% of the global population.
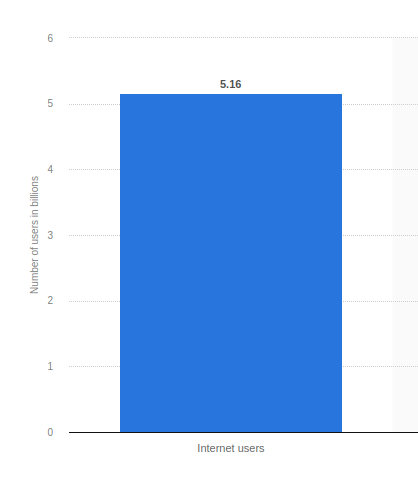
Image via Statista
These people use search engines to find information and answers to their problems and Google only wants to take them to the most relevant and high-quality websites that best match their search queries and intent.
In 2021, Google made a major update to its ranking algorithm and the search engine giant now considers page experience when ranking websites in the SERPs.
This means that it’s not sufficient to just offer valuable content; your website’s overall usability and functionality also play a role in determining your rank in the SERPs.
Therefore, to improve your site’s visibility on Google, you must ensure that your website provides an exceptional user experience, which includes quick load times, safe browsing, mobile-friendliness, and simple navigation.
These are some of the crucial elements of technical SEO you need to pay attention to. This can help ensure that your website appeals to both internet users and search engines. To ensure you’re doing everything possible to make your website efficient, here’s our comprehensive technical SEO checklist.

What is a Technical SEO Checklist and Why is it Important?
A technical SEO checklist is a list of tasks and activities you need to complete to ensure your website is properly optimized for search engines to crawl and index.
It will help you sort the technical aspects of your website to ensure it meets the requirements and demands of modern search engines.
Some of these requirements include an organized site structure, fast website speed, seamless server configuration, among other things.
At this point, it’s now becoming clear why an SEO checklist is important, but there’s more to it.
Search engines are in the business of providing users with the best results and can only determine the usability of a website by analyzing its technical performance.
If the evaluation finds that your website is lacking in certain technical aspects, it will not be displayed on SERPs — at least not at the spot you want it to — no matter how valuable the content is. That’s how much emphasis search engines place on technical SEO.
And what are the consequences of not ranking on search results for relevant queries?
Well, they are many but here are a few of the top ones:
- Loss of visibility: Most people discover online businesses through search engines. If your website doesn’t appear among the top results because your technical SEO is not up to the task, then you lose visibility that is crucial for business growth.
- Loss of traffic: If people cannot find your website through search, you will find it difficult to drive quality traffic to your site. This will force you to use paid channels to get traffic to your site, which may not be sustainable in the long run.
- Reduced revenue: The earning potential of an online business is directly linked to the traffic the website receives. Without a technical SEO checklist, you’ll likely not be able to optimize your website for Google, and this may lead to insufficient traffic, and you may experience a decrease in revenue.
As you can see, a lot can go wrong when your website is not properly optimized for SEO. But when you have a technical SEO checklist and a detailed SOP Collection for SEO, you will know what to do to fully optimize your site for technical SEO and get in the good books of search engines.
For instance, once you’re aware that page speed is a key Google ranking factor, you can take appropriate measures to boost your website’s speed and improve your ranking on search results.
Now it’s time to discover the other 102 steps that will get more organic traffic flowing to your website. Get the SEO Checklist here.
Want to get a sneak peek of what it looks like?
Enter your email and get a free demo version of the SEO Checklist.
The Complete Technical SEO Checklist
Now that you understand why your business needs SEO, it’s time to finally see the technical SEO checklist that will guide you as you work to improve your site’s SEO.
This checklist will help ensure that your website is fully optimized for SEO and primed to attract more traffic, rank higher on search results, and ultimately improve your visibility and online presence.
Without further ado, let’s dive in and get started with your technical SEO checklist.
Use HTTPS
First on our technical SEO checklist is to use the HTTPS protocol for your website.
HTTPS is the encrypted and secure version of the HyperText Transfer Protocol (HTTP).
Google made HTTPS a ranking factor back in 2014 and advised all websites to migrate to the secure HTTPS protocol if they want their web pages to rank higher on search results.
The search engine giant made this decision to protect its users’ personal data from getting into the wrong hands.
HTTPS encrypts the data on a website to ensure it cannot be modified or corrupted during transfer to the user. It also protects it from hackers out to collect individual data from unsuspecting internet users.
Besides keeping user data safe, the enhanced security has the following benefits:
- It will give you a better ranking on search results since HTTPS is a ranking factor
- It provides the details of the referrer in Google Analytics
- It assures users that your website is safe and that any data they provide will be encrypted to prevent data leaks and hacking
After adding HTTPS to your website and moving to the secure protocol, your website URL will get a ‘lock’ symbol in the navigation bar, like in the image below.

Image via SEOBuddy
If you still haven’t moved your website to HTTPS, there will be an information sign before your URL that signals to users that the website is not secure like in the image below.
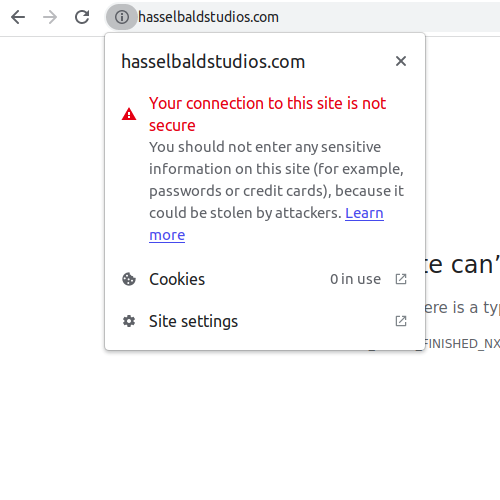
Image via Google
Internet users value data security and many will abandon your site when they see that warning sign. That makes HTTPS a no-brainer.
Set Up Your 301 Redirects Correctly After Site Migration
Site migration is required when you move your website from HTTP to HTTPS.
But as you make the switchover to the secure protocol, you need to set up 301 redirects if you want to preserve link equity. Doing so also helps you avoid having broken links on your website and also two pages with the same content.
In the event of a site migration, you need to ensure your redirects are set up correctly before checking this issue off your technical SEO checklist, else it could damage your SEO. The procedure for setting your 301 redirects is as follows:
- Set the redirect code from the old links to the new ones
- Avoid redirection loops which can mislead the browser and give up a nasty error
- Remove any invalid characters in the URLs
- Submit verified versions of your website, i.e. www vs. non-www
- Add your new website address to Google Search Console
- Submit your new sitemap to Google Search Console
- Monitor any broken links or missing resources
Improve Page Loading Speed
Website loading speed is a vital aspect of technical SEO that determines where your website will appear on search engine results pages (SERPs).
To improve the user experience, Google wants search engine users to find whatever they are looking for quickly. As such, the engine prioritizes fast-loading websites when displaying search results.
This means that if you want to get your website on the coveted #1 spot of Google SERPs for relevant keywords, then you need to optimize your page speed and ensure your site content loads in the shortest time possible.
Google has an amazing tool you can use to measure how fast your website is. Google’s PageSpeed Insights and web.dev measures the core web vitals that the search engine considers key page experience signals as you can see in the image below.
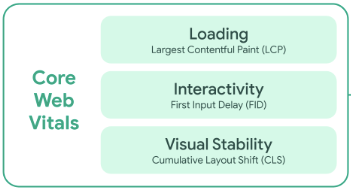
Image via Google
In 2021, Google announced that these signals will be considered in the search ranking to ensure users get enjoyable experiences when browsing the web.
The key vitals that are measured by PSI are:
- Loading: Measured by LCP (Largest Contentful Paint), which is the time it takes to load the largest content asset on the page. A fast LCP reassures users that your website loads quickly.
- Interactivity: Measured by FID (First Input Display). This is the time it takes for a page to be responsive. A low FID reassures users that your website is usable.
- Visual stability: Measured by CLS (Cumulative Layout Shift), this measures how often visitors experience unexpected shifts in layout on your website. A low CLS reassures users that their browsing experience will be delightful.
When you analyze your website with PSI, you will get your score for these key metrics and more. The image below shows the core web vitals assessment of SEOBuddy.
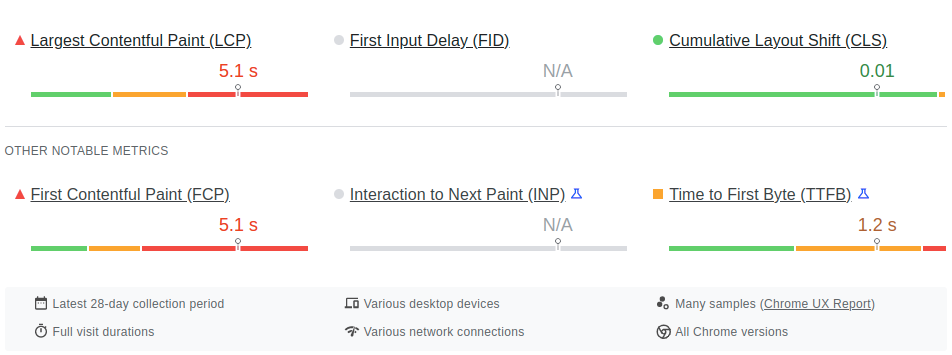
Image via PageSpeed Insights
The tool will also analyze the key performance issues and give you a score of between 0 and 100. The higher the score, the better are your chances of ranking at the top in the search results.
SEOBuddy performs fairly well in this regard, with a performance score of 88, an SEO score of 92, an accessibility score of 68, and a best practices score of 67.
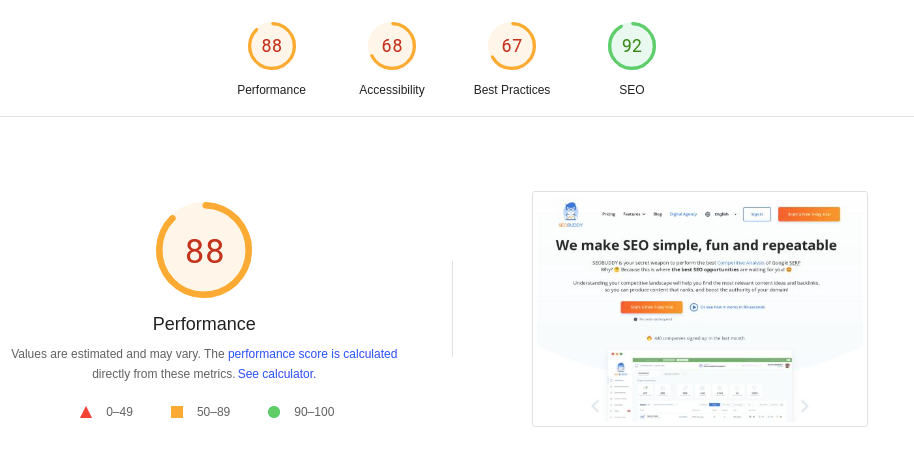
Image via PageSpeed Insights
Further down in the PSI report, you will come across suggestions to improve your page speed and the potential savings you stand to make when you implement those changes.
Following our PageSpeed Insights evaluation, we can save an estimated 1.8s when we resize the images on the website. We can also potentially save 0.84s when we use video formats for animated content and 0.8s when we reduce the unused Javascript files on our site.
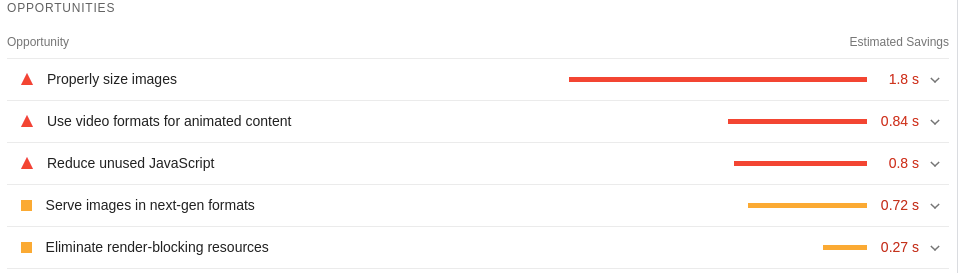
Image via PageSpeed Insights
Although the potential time savings may seem insignificant, it could make all the difference in determining whether your website ranks highly on page one of Google search results or not.
Some of the activities you should add to your technical SEO checklist to make your page loads faster include:
- Compress your images: Adding images is a great way to break up content on your website, but they can harm your page loading speed as they’re much heavier than text.
To make your website load faster, you should compress all the bulky images on your site. You must also leverage image SEO best practices to help your photos rank on Google image search.
- Use a content distribution network: A content distribution network (CDN) allows you to store copies of your web pages on different servers across the world. When a visitor opens your website, they are automatically connected to the nearest server.
This prevents your web files from traveling a long distance, hence greatly reducing your page loading speed.
- Minify Javascript, CSS, and HTML scripts: Unnecessary large scripts on a website increase the time it takes for the site to load fully. Compressing and minifying these scripts can reduce the overall size of the page and dramatically improve your page load time.
- Minimize redirects: Redirects take time to process and this will make your website take longer to load. Auditing your site regularly and removing unnecessary redirects will improve your page load speed.
- Remove unnecessary plugins: Plugins are useful tools for WordPress websites that extend its features and functions. However, having too many of them will slow down your site.
That’s why it’s important to regularly audit your site and remove any outdated plugins and those you’re no longer using.
- Enable cache: Enabling cache allows you to store a static version of your website that will be sent to returning users when they land on your site. This decreases the load time for repeat visitors as most information would already be stored and improves the page experience for such users.
Improve Your Server Response Time
Sometimes, the reason it takes a long time for a website to load is because of its web hosting server. That’s why it’s important to sort your server response time before working on other issues on your technical SEO checklist.
Server response time is the time it takes for the HTML code to start rendering a web page from your server.
Here’s how it works — when you open a webpage, a message is sent to the server and the time it takes for that page to be shown to you is the server response time.
There are several reasons why your server response time is slow, and here are some of them:
- Slow application logic
- Slow database queries
- Slow routing
- Resource CPU starvation
- Frameworks
- Libraries
- Memory starvation
You have to consider all these factors if you want to reduce your server response time to the optimal figure of less than 200ms. And here’s the thing — the longer the server response takes, the longer your page takes to load. So, it directly impacts your page loading speed too.
To improve your server response time, Google advises webmasters to adopt the following practices:
- Collect and inspect current performance data to understand why your server response time is extremely high.
- Identify and fix the issues that are making your server load slowly. If you’re using a content management system or a popular web framework, check the platform’s documentation to learn the best way to optimize server performance.
- Lastly, monitor future performance regression and rectify any issues that crop up.
While it’s possible to improve your server response time by fixing the performance issues highlighted above, sometimes it is better to just get a better server.
A high-quality server is optimized for maximum performance and has adequate resources and processing power to handle high traffic volumes. As such, investing in a better server will improve your website’s loading speed and overall user experience.
However, moving your website to a new server is not as easy as it sounds. Such migrations require careful planning and execution to ensure everything goes well without any downtime.
This includes transferring assets such as files, configurations, and databases from your old server to the new server. This migration can take several hours or even days depending on the complexity of your server setup.
You may also be required to work with an experienced server administrator to set everything up properly. So, take time to assess your needs and choose a reliable server with superior security features, technical support, and scalability options to ensure your website is set up correctly.
Reduce the Number of Resources on Your Site and Limit HTTP Requests
One of the other things that affects the performance of a website is the number of resources it holds. When a visitor lands on a website, a request is made to the server to access the requested files.
The larger the files, the longer it takes to respond to the user’s request.
Multiple, rapid requests made on a server also slow it down. Many factors are responsible for the slow response time but you can compare it to transferring one large file to a drive versus transferring many small files.
Normally, small files take a long time to transfer because there’s a lot more work to move and arrange the small files compared to moving one large file.
To improve your load times and improve the user experience, you want to reduce the number of HTTP requests when a visitor accesses your website.
To check your site’s HTTP requests, open your website in an incognito tab. This ensures there are no cached requests to keep the number of requests low.
Next, right-click anywhere on the page and click the inspect button at the bottom. Then, you should find the Network tab and refresh the page by hitting F5.
This will immediately start monitoring the number of HTTP requests and the exact number will be displayed at the bottom of the screen as in the image below.

Image via SEOBuddy
There’s no ideal number for the number of HTTP requests but you want to keep this number below 200. A large website can have many requests but you can get rid of unnecessary resources like sliders to reduce your HTTP requests.
Another helpful thing to do to keep this number low is to combine JavaScript and CSS files in one file. This will ensure that only one request is made to load these resources.
However, you should note that these changes can mess up your entire site. So, make sure you have a backup of your databases and files before combining any files. This will ensure you don’t end up breaking your site.
Ensure Your Website is Optimized for Mobile Devices
Most people use mobile devices to access the internet. In 2022, close to 5 billion people accessed the internet through a mobile device and this number is growing steadily.
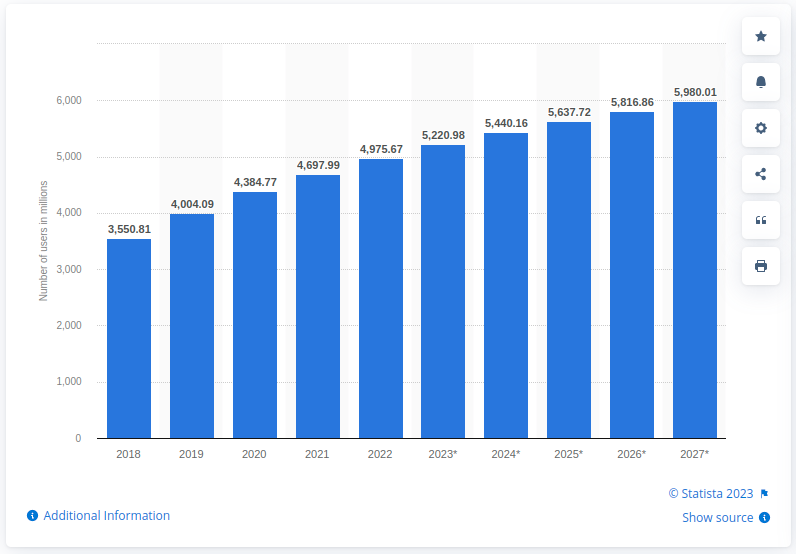
Image via Statista
Google wants these users to have a fulfilling experience when using their search engine and that’s why it came up with a mobile-first indexing policy. This means that Google first assesses the mobile-version of a website to determine its relevance and quality for search rankings.
So, the next item on this technical SEO checklist is mobile optimization. It’s the key to getting your website to rank higher in searches.
But you shouldn’t just focus on the design of your website to ensure mobile responsiveness. You should also pay attention to the speed and functionality of your website to ensure mobile users can use it without any challenges.
The best thing to do is to adopt a responsive website design that adjusts seamlessly to fit any screen size. It’s best to design for mobile and then scale the website up.
Luckily, most website builder and themes come with responsive designs that guarantee the mobile-friendliness of your website. If you have an old website that was not built using such responsive systems, consider redesigning it to make it mobile-friendly.
Else, you can bid your wish to rule the SERPs goodbye. That’s because Google only wants to drive users to mobile-friendly websites.
To check if your website is mobile responsive and check this item off your technical SEO checklist, you can test it on Google’s Mobile-Friendly Test Tool. Simply paste your website URL on the site and Google will let you know if your website is usable on mobile devices.
The image below shows the mobile-friendly test results of seobuddy.com. As you can see, the website is mobile-friendly and can be used effectively on all mobile devices.
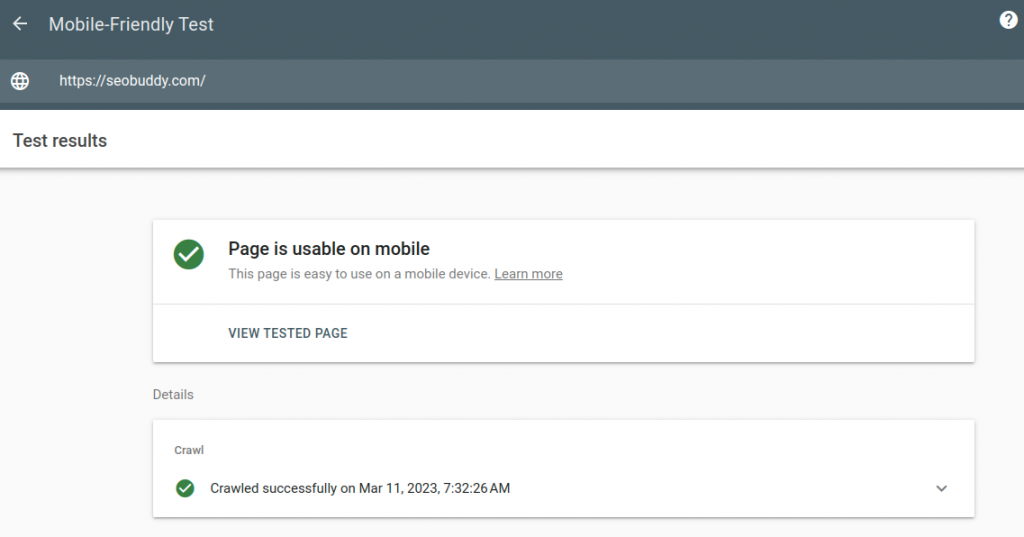
Image via Google Mobile-Friendly Test
Use Simple URLs
Another crucial aspect of SEO that comes next in this technical SEO checklist is the URL structure. You need to keep it as simple and straightforward as possible to improve your search performance.
Google asks users to implement a simple SEO-friendly URL structure that is easy for humans and search engine crawlers to understand. Overly complex URLs are a challenge for crawlers to understand and this makes it difficult for them to correctly index and rank your site.
That’s why it’s important to take time to build URLs that are search engine friendly. Content management systems like WordPress have their own URL structure that’s applied when you publish a post or create a page, but they give you the option to change it too.
By default, the URLs have an unrecognized structure made up of random numbers, characters, and irrelevant words which makes it difficult for search engine crawlers to understand what the page is all about.
Considering that search engines cannot rank sites they don’t understand to ensure they don’t direct users to irrelevant content, it’s crucial to customize your URLs to make them search-engine friendly.
From your admin dashboard on WordPress, navigate to Permalinks and select the Custom Structure option to customize your URL.
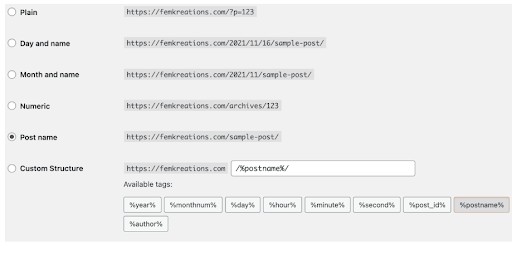
Image via WordPress
Where possible, use relevant keywords to help users and search engines understand what the page entails. By doing so, it becomes easy for search engines to locate and rank your website, thus improving your website’s visibility and traffic.
The image below shows the URL of a blog post on SEOBuddy’s website that talks about content SEO. Notably, the URL has the keywords “Content SEO” thereby increasing the chances of the post being found and ranked by search engines.
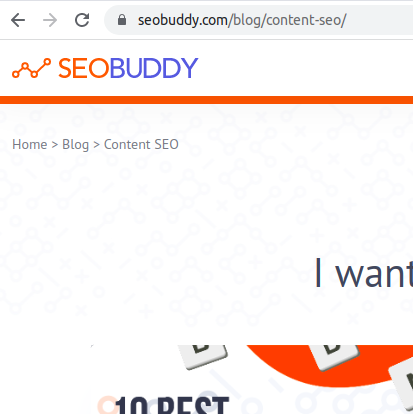
Image via SEOBuddy
Google has a few recommendations on how to structure your URLs to make them search-friendly. They include:
- Use simple, descriptive words, for example – “https://myexample.com/blog/search-engine-optimization”
- Use UTF-8 encoding where necessary, for example – “ https://www.myexample.com/%D9%86%D8%B9%D9%86%D8%A7%D8%B9/%D8%A8%D9%82%D8%A7%D9%84%D8%A9”
- Choose a country-specific domain, for example – “ https://myexample.uk”
- Use a country-specific subdirectory, for example – “ https://myexample.com/uk/”
- Use hyphens to separate words in your URL, for example – “https://myexample.com/blog/video-marketing-strategies”
- Don’t use long, unreadable IDs in the URL, for example – “https://www.myexample.com/index.php?id_sezione=360&sid=3a5ebc944f41daa6f849f730f1
- Don’t use an underscore, for example – “https://myexample.com/blog/video_marketing_strategies”
- Don’t join words together, for example – “https://myexample.com/blog/videomarketingstrategies”
Use Structured Data
Next in this technical SEO checklist is the use of structured data.
Structured data uses a specific language called schema markup to label and identify the content of a webpage for search engine crawlers.
By labeling content this way, structured data makes it easy for Google to understand the content of a webpage and list it for rich results.
This is the first step before search engines rank websites on search results. By making it easy for them to understand your content, you increase your chances of appearing for the rich results for relevant searches.
Rich snippets are enhanced search results with additional information about a page. The rich results are meant to help users understand the relevance of a webpage at a glance and determine whether to click the link to open the website or not.
The schema clearly defines what the element stands for, how it relates to the website, and how it should be interpreted by search bots. Basically, it tells search engines, “This is the definition,” “This is the product,” “This is the introduction,” “These are the FAQs,” and so on.
In the example below, Booking.com uses FAQ structured data to label the FAQs on the page. Accordingly, Google displays the FAQs alongside the page link, post title, and description on the search results page.
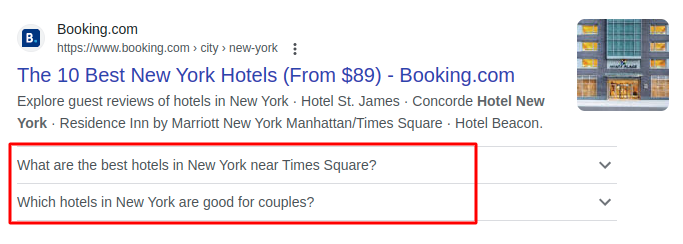
Image via Google
The rich results will ensure that your website gets more SERP real estate, and thus, has a higher chance of driving clicks and traffic.
For example, you can add your blog post’s rating like Simply Recipes does in the image below to generate clicks and drive traffic.

Image via Google
More clicks and site visits will convince search engines that your website has valuable content and is worthy of the top rankings on SERPs.
Besides rich snippets, you can use the structured data to:
- Get your website featured in the Knowledge Graph
- Gain advantages in AMP and Google News, and access to beta releases
- Help Google provide custom results from your website based on the content of the schema markup
After labeling your content with structured data, you should test it on Google’s Rich Results Test tool. The tool will help you figure out if you have done everything correctly to help you avoid being penalized for creating poor structured markup.
Fix Duplicate and Thin Content
The next tip in this technical SEO checklist is related to content. To ensure your website ranks higher on search results, we cannot forget duplicate and thin content.
If you have a dedicated content strategy and write original content for all your pages, then you don’t have to worry about duplicate and thin content However, duplicate content can easily crop up on your site, especially when your content management system creates multiple versions of the same webpage on different URLs.
For example, the CMS can create two URLs for the same content like this:
- https://myexample.com/resources/techincal-seo-checklist/
- https://myexample.com/library/technical-seo-checklist/
And this might just cause Google to penalize your website. And even if it doesn’t, it can bring about undesirable issues, such as:
- Undesirable URLs ranking in SERPs
- Backlink dilution
- Wasted crawl budget
The same also applies to thin content. Google doesn’t have a problem with it but it can hurt your search performance since search engines want to present users with high-quality content that provides value to them.
To address thin and duplicate content problems, use a site audit tool like Raven Tools to audit your site. The tool will scan your site for thin and duplicate content and let you know which pages need your attention.
For example, the below site audit reveals that 6 pages have duplicate titles and 221 pages have thin content.

Image via Raven Tools

Image via Raven Tools
You can fix duplicate content on your website by setting up redirects to the primary version of a page on your site. This way, all the duplicate URLs will redirect to the primary version when visitors click the link.
You can also implement canonical tags on your pages to help Google understand which page to rank. The canonical tag looks like this (rel=”canonical”) and it’s added to a link to identify it as the original version that Google needs to index and rank.
So, when Google comes across similar URLs, it will prioritize the one with the canonical tag.
Lastly, you can consider content pruning to ensure search engines don’t come across multiple pages with the same content when analyzing your website.
Ensure Your Site Architecture is SEO-Friendly
Site architecture defines the way pages on your website are linked together.
It’s important for search engines as it simplifies the crawling process, and therefore, makes it into our technical SEO checklist.
An efficient site architecture organizes the pages on a website in a way that’s easy for search engines to find and index.
So, when designing your site, you must ensure that your web pages are not too far away from the homepage like in the image below.
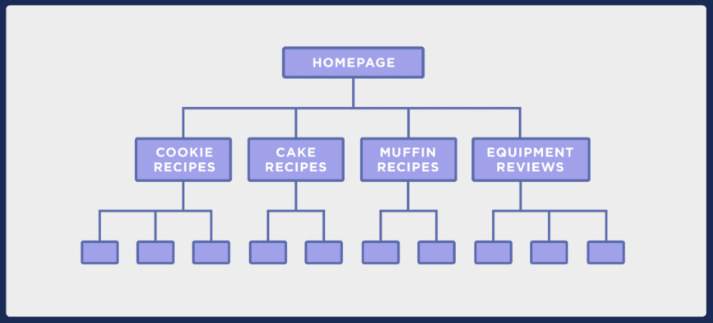
Image via Backlinko
The pages in the site architecture above are arranged logically. The homepage links to the different recipe categories. The recipe categories then lead to specific individual recipes.
A site structure like this is easy to crawl and search engines can quickly find individual recipe pages down the hierarchy.
Organizing your site structure this way also ensures there are no orphan pages.
Orphan pages are web pages that don’t have any internal links that point to them. This makes it difficult (sometimes even impossible) for search engine crawlers to find them, let alone index them.
Additionally, you should use a shallow site architecture to ensure crawlers and visitors can get to the desired page in just a few clicks. Ideally, your pages should not be more than four clicks from the homepage.
A deep site structure like the one in the image below could mean that certain pages may take about 10 clicks to reach them. And such a situation is undesirable.
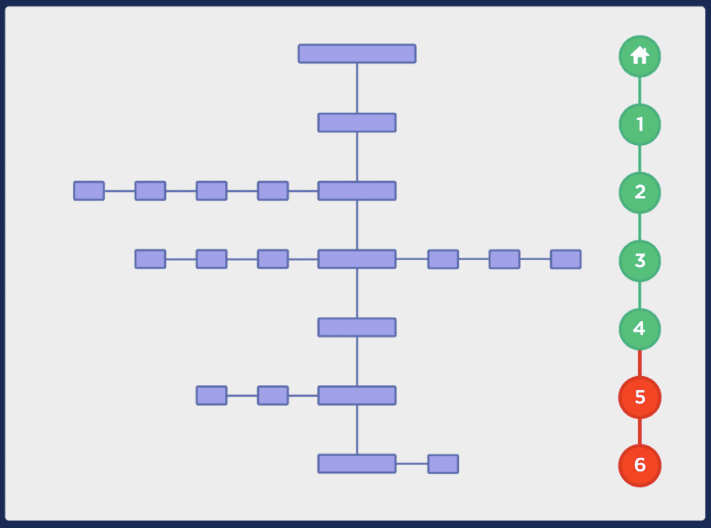
Image via Backlinko
Even if crawlers have no problem finding such deep pages, their search performance is harmed by the fact that they are far away from the homepage.
On a website, the homepage tends to get a lot of backlinks than pages down the site architecture, hence they have a higher domain authority. As a result, the link juice won’t pass through to them if they’re far away from the homepage.
Use Sitemaps
Your technical SEO checklist will not be complete if it doesn’t involve submitting your sitemap to Google.
A sitemap is an XML file that acts as the blueprint of your website. The sitemap contains all the important pages of your website, making it easy for crawlers to read and understand how your website is structured.
If you don’t have a sitemap, the first thing you need to do is to create it. There are different ways to do this as you will see below.
If your website is built using WordPress, then you can use the Yoast SEO plugin to create the sitemap. The main advantage of using Yoast to create your sitemap is its automatic update feature.
This means that when you create a new page on your site such as a product page or new blog post, the plugin automatically adds a link to the new page in the sitemap.
This saves you the trouble of manually updating your XML sitemap to ensure search engines have the correct structure of your site.
If you don’t have Yoast, you can use other WordPress plugins for sitemaps such as Google XML Sitemaps by Auctollo.
Image via WordPress
Suppose you don’t use WordPress, what’s the alternative approach?
Well, there are third-party tools like XML-Sitemaps.com that you can use to create a sitemap for your website.
Once created, your sitemap can be found in any of these URLs in the page source:
- yourwebsite.com/sitemap.xml
- yourwebsite.com/sitemap_index.xml
When you locate your sitemap, you need to send it to Google via the Google Search Console. Head over to the Crawl Section of Google Search Console to first add your sitemap.
After adding it, you can test it to see if there are any errors.
Testing your sitemap on Google Search Console is very easy. Simply enter your sitemap URL and click the “Test Sitemap” button. When the test is complete, click the “Open Test Results” button to check for errors.
If there are any, fix them and re-submit your sitemap. When you receive a notification that says, “Sitemap index submitted successfully,” it means that Google has effectively scanned and processed your sitemap.
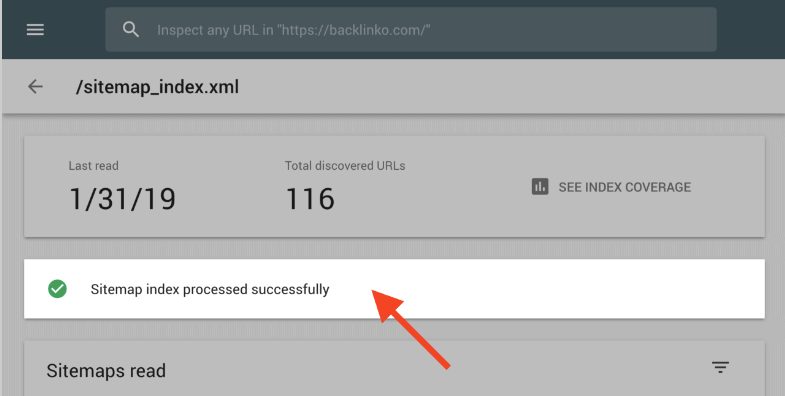
Image via Backlinko
Google will regularly read your sitemap to find new pages to index, so make sure your sitemap is updated regularly.
Find and Fix Broken Pages
Broken pages on your website negatively affect the user experience. Such links lead users to an error page and can cause frustration among users, leading to poor experience. They’ll most likely bounce from your website on encountering a broken link.
And if there were backlinks on those pages, they go to waste since they point to a dead resource.
That makes broken link building a critical part of a technical SEO checklist.
To identify the broken pages on your website, you should crawl it with a site audit tool like Semrush. Enter your site’s URL to start the audit process.
Once the tool gives the results of the audit, click the “Errors” tab to find the broken pages.
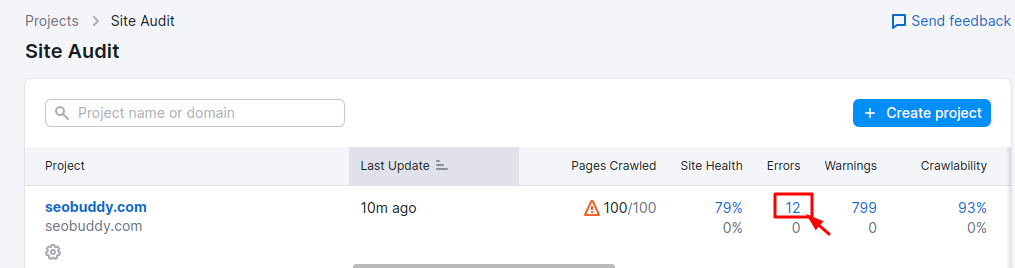
This will take you to a page that highlights all the issues with your website. However, we are interested in the broken pages. Scroll down the page and click on the section that shows the pages that returned 4xx errors.
In our example, only one page returned a 4xx error.
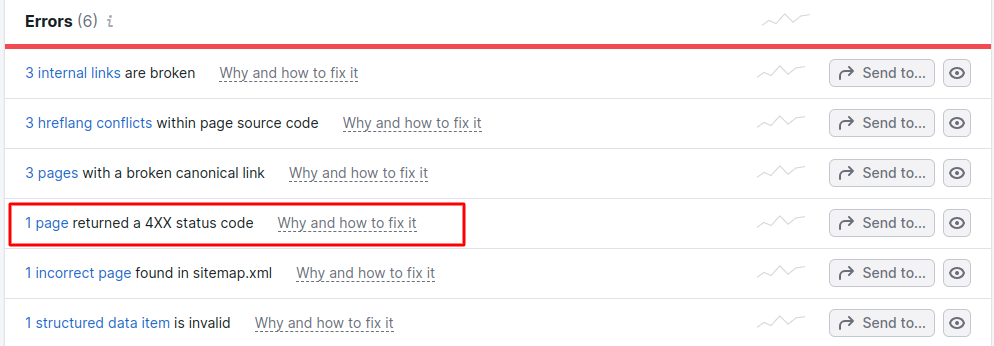
Image via Semrush
Click the link to discover the page that’s broken.
You have two options for fixing the broken pages on your website. They are:
- Reinstate the pages that you deleted accidentally
- Redirect old posts with valuable backlinks to relevant pages on your website
Once this is done, you will not have any broken pages on your site and can check this matter off from your technical SEO checklist. However, you want to regularly audit your site to catch any broken links that may arise for one reason or another.
The Link Chest is a collection of high-quality, easy-to-win backlink opportunities. It’s the smart way to kickstart your SEO mission and improve the rank of your website in Google.

“This is such a simple idea but very well executed. I’ve been powering through this giant list of backlinks for a few hours and already have loads pointing to my site. Link Chest is an essential tool for early stage link building.”
Use Hreflang to Display Your Content in Different Languages
If you want to connect with users from different parts of the world, you need to ensure your website content is available in different languages.
Using the hreflang tag to display your content in multiple languages ensures that everyone who accesses your site will find that the content is in a language they understand.
This will increase the amount of time users spend on your website, helping you earn get into the good books of search engines when it comes to ranking websites on SERPs.
Most websites are only available in one language. So, making yours available in several languages will help you check off this crucial factor of your technical SEO checklist. It’s also important for international SEO.
For example, our homepage is available in three versions.
Here’s our website in English.

Image via SEOBuddy
Here’s the Polish version of the homepage:

Image via SEOBuddy
Lastly, this is the French version of our homepage:

Image via SEOBuddy
To inform Google about the language of these pages, we used Hreflang tags for each of the versions.
Adding this tag is quite simple. Just add the appropriate tag in the <head> section of the homepage source code.
In our case, the tag looks like this:
<link rel=”alternate” hreflang=”en” href=”https://seobuddy.com/” />
<link rel=”alternate” hreflang=”pl” href=”https://seobuddy.com/pl/” />
<link rel=”alternate” hreflang=”fr” href=”https://seobuddy.com/fr/” />
This code created a drop-down menu visitors can use to select their preferred language as you can see in the image below.
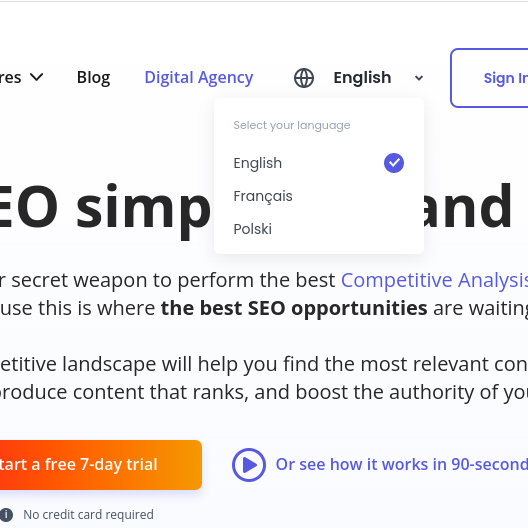
Image via SEOBuddy
Utilize Robots.txt
Lastly, you want to add robots.txt to your website. It’s yet another important part of technical SEO and makes it to this checklist. robots.txt makes it easy for search bots to crawl your site.
When bots crawl a site, they first check how the robots.txt has been configured. This protocol gives you the chance to allow or disallow robots from crawling your website, including specific pages and sections.
If you don’t want bots to crawl and index your site, you can use the noindex tag.
You may be wondering why you should use the noindex tag for certain pages, right?
Well, not all bots who access your site have good intentions. Some are malicious and you need to stop them from accessing your website and corrupting your content. Additionally, it gives you greater control over which pages to index and which ones to not.
What’s more?
Regarding indexing, it’s important to use the noindex tag so as not to exhaust your crawl budget. You don’t want to waste your crawl budget on pages that don’t add any value to your SEO performance such as your login page or thank you page.
By asking search engine crawlers not to index these pages, you get to prioritize your crawl budget on the pages that matter.
FAQs
Q1. What is technical SEO?
A. Technical SEO is a combination of different practices that aim to improve the technical aspects of a site to boost its ranking on search engine results pages. A technical SEO checklist can help ensure you’ve got all the parameters right for better website performance.
Q2. What is a technical SEO checklist?
A. A technical SEO checklist is a list of the tasks and activities you need to complete to ensure your website is properly optimized for search engines to crawl and index.
Your technical SEO checklist will help you sort the technical aspects of your website to ensure it meets the requirements and demands of modern search engines.
Q3. What are the technical SEO techniques?
A. The technical SEO techniques you need to implement to improve your search ranking include:
- Using HTTPS protocol
- Setting 301 redirects
- Improving page speed
- Submitting your sitemap
- Using SEO-friendly URLs
Q4. How do you conduct a technical SEO audit of your site?
A, Use a site audit tool that crawls your website to examine its technical aspects. The tool will help you learn how long it takes for your pages to load.
It will also point out the broken pages and the duplicate and thin content that’s harming your site performance.
Q5. What are the key aspects of technical SEO?
A. The key aspects that should be in your technical SEO checklist include site experience, authority, and relevance.
Conclusion
Optimizing your website for SEO is important if you want to generate more traffic, improve the user experience, and move up the search engine rankings.
Having a comprehensive technical SEO checklist like what we have shared in this post will help you identify and work on any technical issues that could be hindering your site’s performance such as poor site structure, slow load times, duplicate content, and broken links.
By prioritizing the technical SEO factors raised in this checklist, you can ensure your site is secure, well-structured, and easy to crawl for search engines.
So, start working on your site’s SEO using this technical SEO checklist and solve your performance needs so you can start enjoying the benefits of a properly optimized website.
CEO & Founder at SEO Buddy